Since the horses got here a few months ago, we have been doing nothing but working in open space. Having never worked in totally open space before aside from trail riding, this was a new and different experience and I like some of the benefits of this, but also it has it’s disadvantages especially when you have a horse who you need to work on “slowing down” and open space to him means free for all to leave and you best just hang on for the ride.
For the past few months, we have been planning a round pen as a small controlled work area and also a small turnout since currently we do not have any of our pasture area fenced yet. Hand grazing several times a week has been very time consuming and not ideal. Since we are not white collar high class money oozing out our ears folk here, budget and cost is important and we needed a way to create an enclosure that would not break the bank but would contain my two (mostly) broke creatures and give us a safe space for them to have a bit of freedom.
I will explain how we built a round pen for under $400 in actual materials, not including tools which you can either buy or rent if you don’t have them. Considering corral panels are somewhere over $100 each and you need quite a few to make a round pen, and the lowest quote I got for someone to build a 4 board round pen was $2800, I think the $400-ish mark is a total win. Even with purchasing a hand held auger and a few other things to complete this task, we still came out WAY ahead of buying panels or paying a company to build something, and we have tools to help us work on future projects like a larger turnout space, which we will likely build the same way as we did this.
MATERIALS:
• 2 – 5 inch diameter, 8 Ft tall treated fence posts ($20 each from TSC)
• 8 – Treated landscape timbers ($5 each from Menards) These are a decent diameter, and although they are not round like line posts for fencing, they were much less expensive and still treated, so that’s what we picked to use. You could probably use T-Posts if you are comfortable with those, but that’s just not what I wanted.
• 6 – 60 lb bags of concrete ($4 each from Lowes)
• 2 – Rolls of Zarebra Poly Rope (I actually used the balance of a roll of electrobraid I scored for $60 second hand, and used 1 roll of the zarebra for the balance that didn’t cover. I like the electrobraid better, but at over $200 a roll new, I wasn’t going to buy it just for this considering this pen will not be electrically charged. (The Zarebra rolls are $58 each from Menards).
• 2 – Bags of Zarebra electric fence screw in insulators, 25 count. ($10 each from Menards)
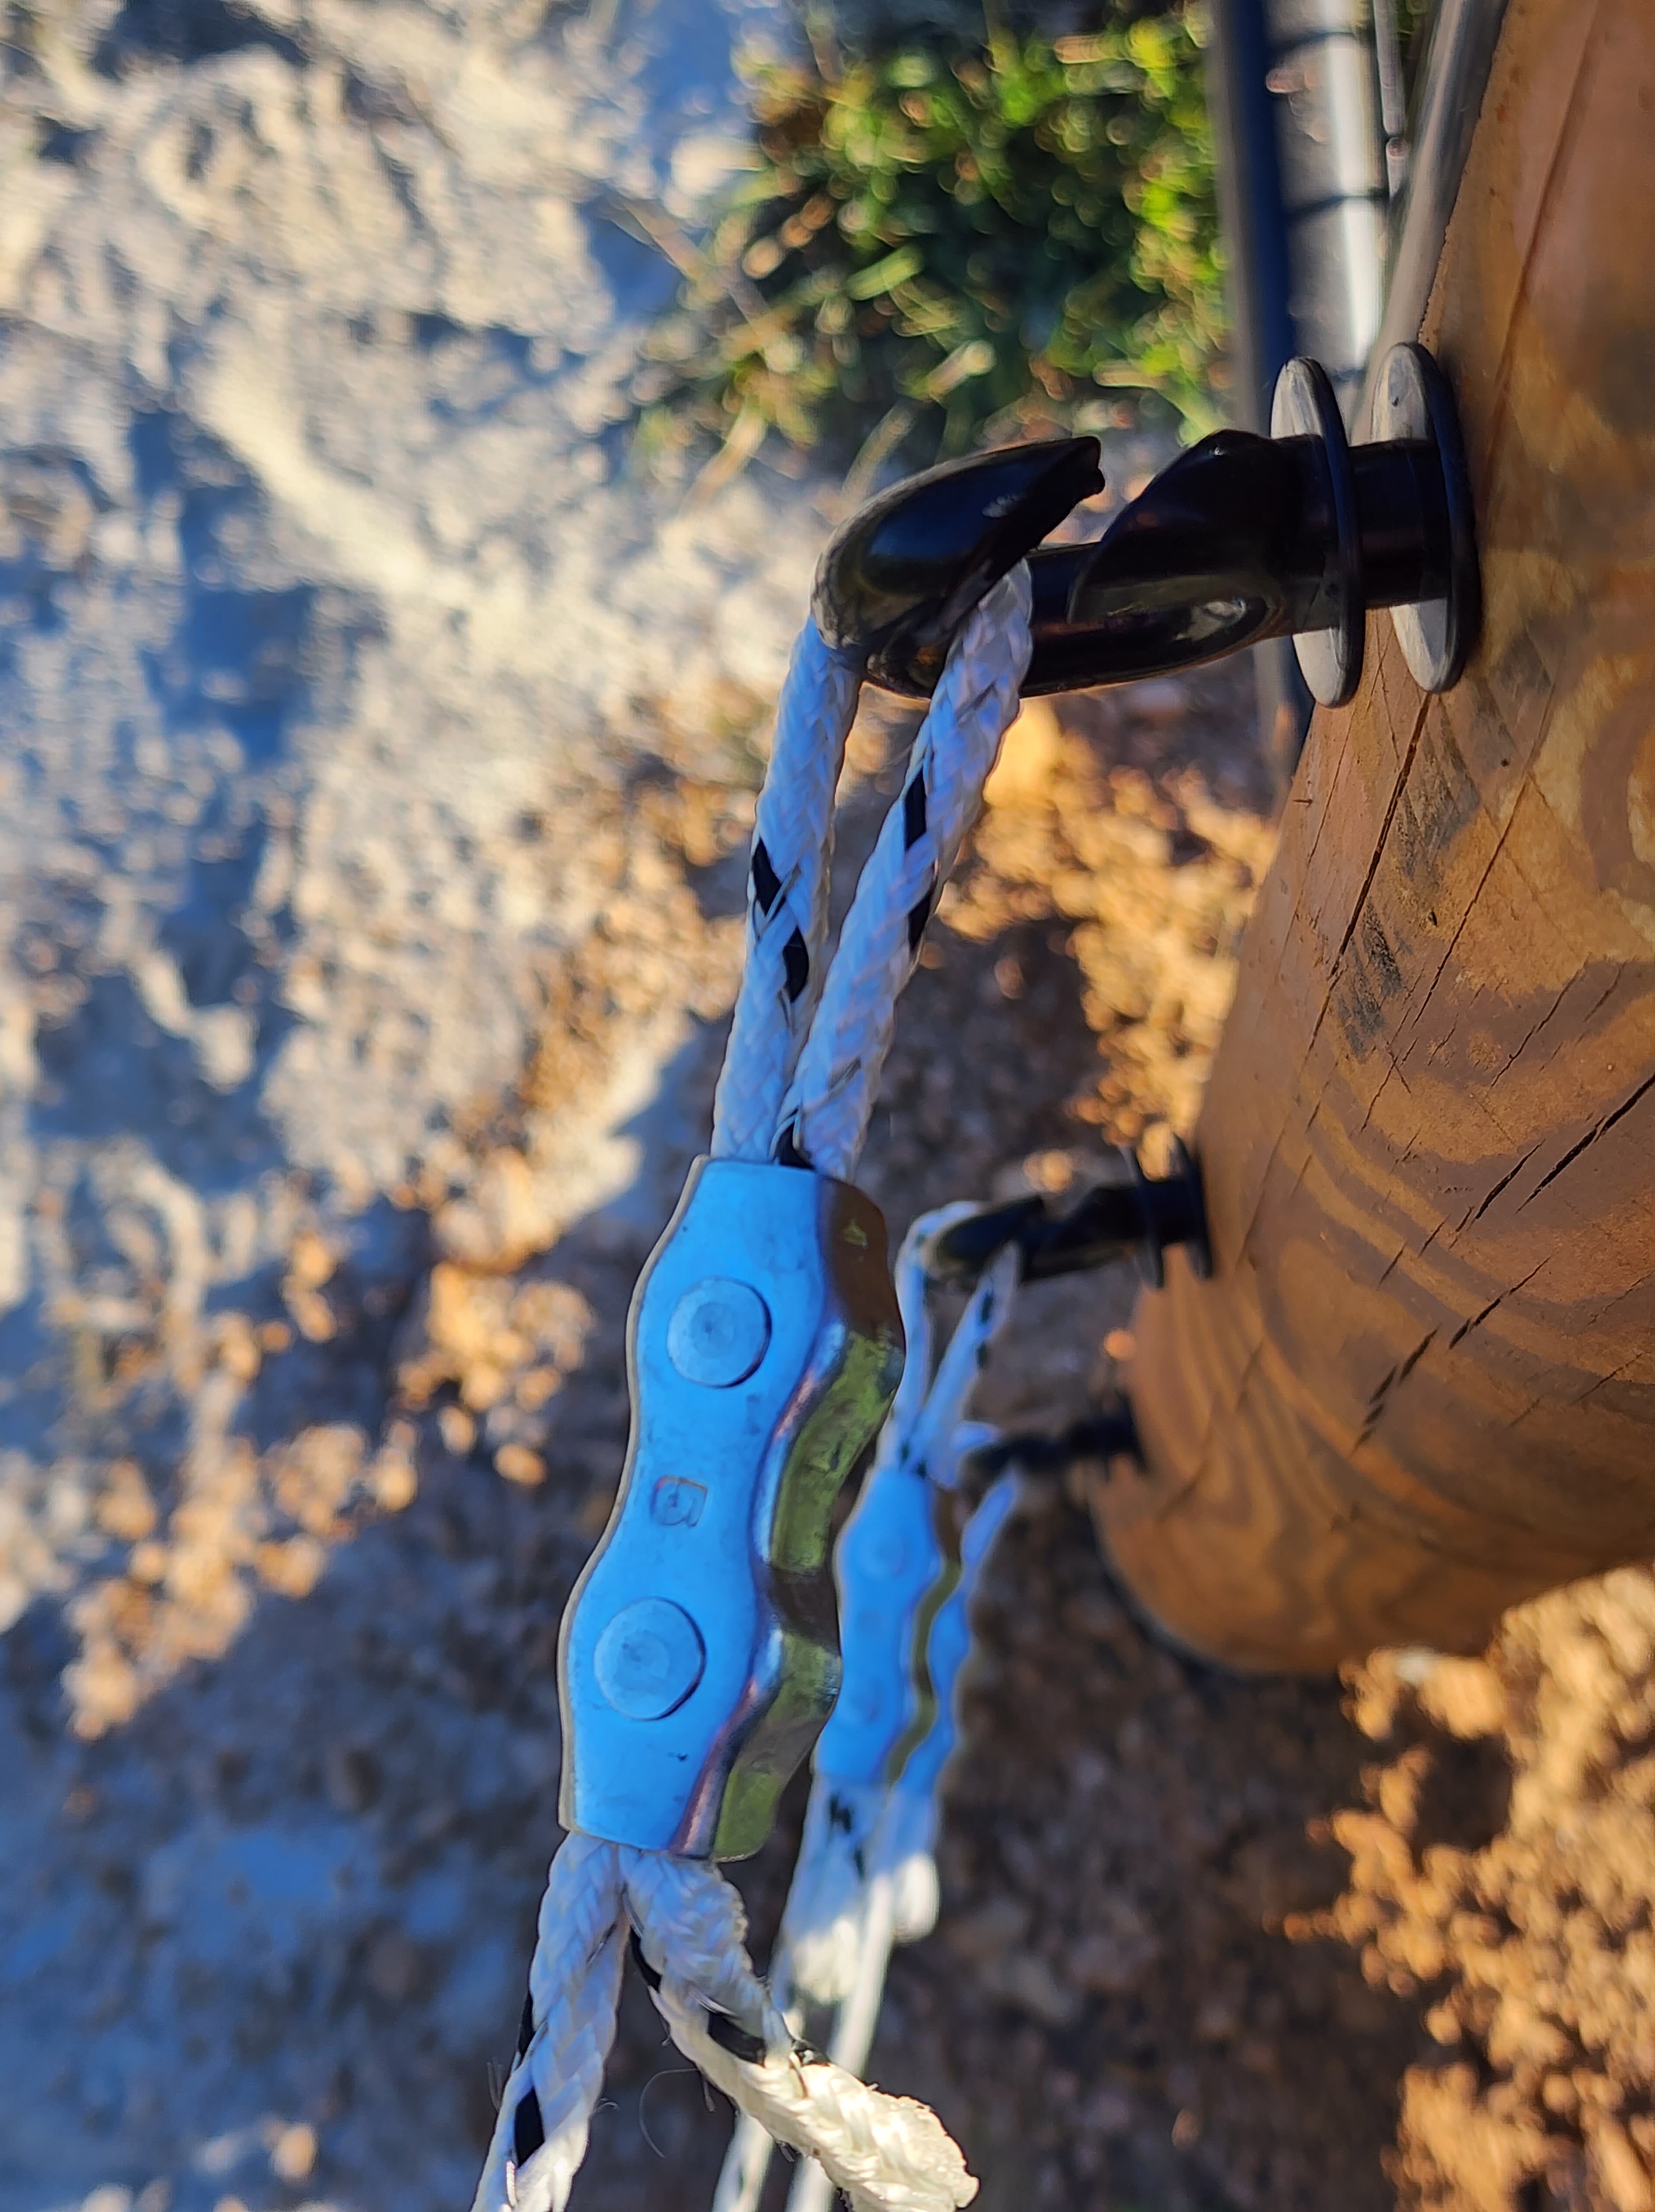
• 1 – Bag of Poly Rope Fence Connectors (I got them off Amazon, much less expensive than the name brand ones at the local farm store ($21 for a bag of 20, I only needed 10 for this-1 connector for each the beginning and the end of each strand) Make sure these are made for the size of rope you are using, as there are different diameters and the connectors will only fit a certain size rope. The ones I got are for 1/4″ rope, which is what we used.
• 1 – 6 ft Gate ($139 from a local fence supply company)
• Stain/Sealer (if desired) I used some leftover stuff I used on other projects around the house, it didn’t take a lot to do these posts. I would have chosen a different color had I bought something specific to this project, but this way I didn’t have to buy anything. You could choose to leave them natural.
• Footing if you choose to add any. We did lime dust around the edges just so they wouldn’t be a muddy mess when it rains. The center is grass since we wanted the option to use this as a small turnout here and there while we get enough money saved to work on actual pastures.
TOOLS
• Manual Post Hole Digger
• Tractor 3 point hitch auger or gas powered auger-we bought a gas powered hand held one, it was less expensive than the 3 point hitch one for a tractor.
• Pinch bar (we got this one, and couldn’t have completed the project without it due to hitting rock) https://www.tractorsupply.com/tsc/product/groundwork-18-lb-pinch-bar?cm_vc=-10005
• Adjustable wrench
• Drill
• Screwdriver
• Bucket (or wheelbarrow) to mix concrete in
• shovel or rod to stir concrete
• Stakes or spray paint to mark your post location
• Tape measure
• level
INSTRUCTIONS
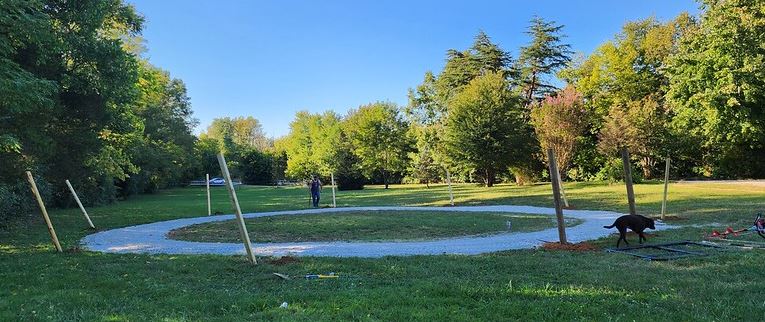
- Start by deciding the size you want to make your round pen. I chose a 60 ft diameter, as this is standard for working larger horses and gives a space large enough to ride in a balanced manor. It’s also a big enough space to let 2 horses loose in.
- Mark the center of your circle and put a stake there.
- Divide your desired diameter in half and measure that far from your center to mark where your first post will go. Since we chose 60 ft, I went 30 ft from center and marked my first gate post.
- Measure out the rest of your posts and put a stake in each spot. I placed the 2 fence posts for the gate a little over 6 ft apart to accommodate the 6 ft gate. Admittedly the opening is a little wide, but it works fine for my guys anyway. The landscape timbers are each 20 ft apart. You could add more posts if you wanted to, but this distance is fine for the poly rope and worked for my pen.
- Start digging your holes. If you have nothing but dirt, the gas powered auger will make quick work of this. I am 5’8 and not the skinniest or the strongest person in America, and even I could use the one we bought without much trouble on just dirt. My husband did most holes, but I did one and it wasn’t bad to use. If you hit rock though… the auger is essentially useless. That’s where the pinch rod comes in. That’s also where I was about useless. My husband had to slam this thing into the holes we were making hundreds of times over the 5 holes we hit rock on. Bless his heart for loving me enough to do this. I tried also, but just couldn’t put enough power behind it to do a lot of good. He would bust rock, and I would use the manual post hole digger to dig the hole out while he took breaks from rock busting. Here you can see an example of one of the rocky holes we dug with this time consuming, tiring, frustrating method. If you have a better way, by all means do that. As first time “fencers” this is the only way we could think of. We spent about 3 hours digging 5 holes manually, and about 20 minutes digging the other 5 where we didn’t hit rock with the gas powered auger.

- Once all your holes are dug, you can start setting your posts. We concreted every post because with this being a circle each one was going to have at least some tension on it with the rope. Just mix up your concrete and add some to each hole. We filled the hole somewhere between 1/2 and 3/4 with concrete depending on hole depth. Some of the rocky holes were a little more shallow (18-ish inches) but the augered holes were around 2 ft deep or a little more. Make sure your post is straight using a level, and pack dirt in on top to secure it straight. This took both of us to do, I’m not sure 1 person could do this part successfully. We let ours set overnight before we did anything else.
- Decide the height you want and measure for your insulators. I put the top strand at 5 ft high and did 5 strands because I felt like this would be most secure. So, 5 ft, 4ft, 3 ft, 2 ft, and 1 ft on the post was marked with a dot on all posts first. Then I drilled a pilot hole on each mark so putting the insulators on would be easier. I used a screwdriver through the “hole” in the insulator as a handle to rotate it until it was all the way screwed in instead of screwing it in with my hands. I hope this makes sense.
- Once your insulators are on, it’s time to string up your strands of rope. Start by making a loop at one end through the connector and secure the connector in place. Photo below of how this looks. Put this onto your first insulator and then run your strand all the way around. Pull it tight and add another connector with a loop the same way through the last insulator. Make sure the entire way around is pulled tight, and adjust your end connector to take up the slack. Repeat for every strand you run.
- The last step is hanging the gate. Pilot holes were drilled for the gate hinges, then used the adjustable wrench to rotate them until they were secure. The adjustable wrench was used to add the nut to the top hinge piece and tighten. We opted to tighten it until you have to push/pull on the gate to move it, but it could be left more loose if you prefer the gate swing freely.
And DONE! Sit back and enjoy the fruits of your labor. Ride in it. Turn out in it. Do whatever you want!! 
Disclaimer: We are not a professional fence builders, or even close. We have never constructed fencing, a round pen, or anything prior to doing this method of making a fence/pen. This is just what we could come up with on a budget and within our personal capabilities. Will it hold up over time? I don’t know. Will it keep in wild mustangs? Probably not. Will something very determined be able to bust out of it? It’s likely. Will it work for our purposes for our particular 2 horses? Absolutely. Keep in mind your animals level of training and respect for fencing/boundaries when you are building a round pen or any containment area for them and build something you feel will safely contain them. If this will work for you, terrific! Just know I am under no illusion that what we built will work for everyone. It will work for us so I wanted to share incase it could work for someone else who is also needing a very budget friendly option.
Check out the boys enjoying their first bit of freedom in this new space
