Do you have an impossible horse to fit a sheet/blanket to, but still want or need to use one for some reason or another? A wonderful suggestion from a friend of mine has eliminated Duke’s awful rubbing. Shout out to Emily and her Mom for this tip! Duke is either the worst to fit, has super sensitive skin, or maybe both? Earlier this year (somewhere around the end of June, beginning of July), he broke out in bumps all over his body due to biting flies and/or mosquitoes. To try and fix it, I went out and got the latest and greatest Ultrashield Gold fly spray. It was supposed to be great, as I’ve read and heard great things. Well, it gave Duke massive welts all over his skin ON TOP of the bug bites. Poor thing was miserable and after feeding him zyrtec at the suggestion of my vet, I broke down and purchased each horse a Rambo Protector Integrated Hood (meaning it doesn’t detach) fly sheet. My bank account hates me. It’s always something. Don’t mind me while I go make a withdraw and light it on fire and that’s about how things go around here.
By the way, the Ultrashield Green, their Natural Spray has worked pretty good for us this year during training, doesn’t do squat for turnout though-nothing seems to last for turnout.
Anywayyyy the Rambo sheets fit pretty nice and it was working well without rubs for a few weeks, I was so happy! Then one day I brought them in and noticed it had started rubbing too. Once it started rubbing, within a few days his shoulder was basically raw. I wanted to scream. I may have yelled profanities out loud in the barn. I can put literally anything on Fizz and he is fine. He could wear a garbage can and not have any problems. I could put a billion dollar cashmere and luxury silk sheet (or whatever fine expensive soft fabrics are out there, I’m really no fashionista) on Duke and he’d be rubbed raw within a few weeks.
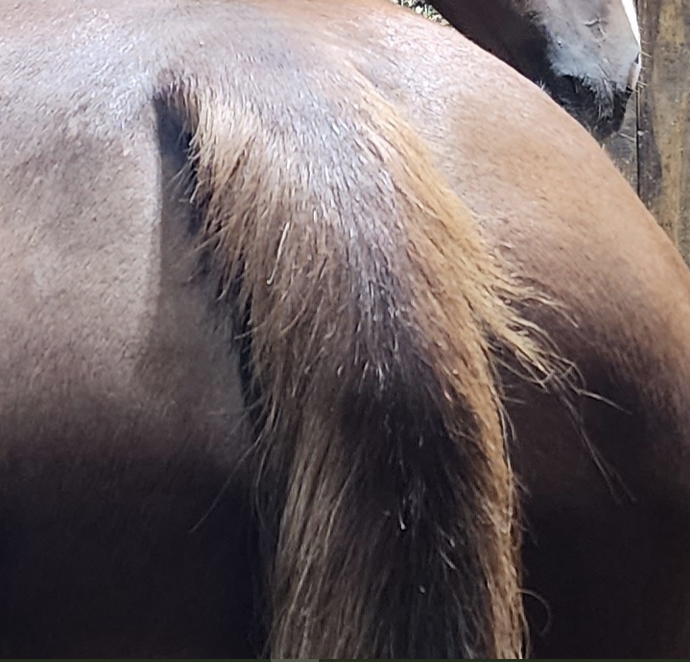
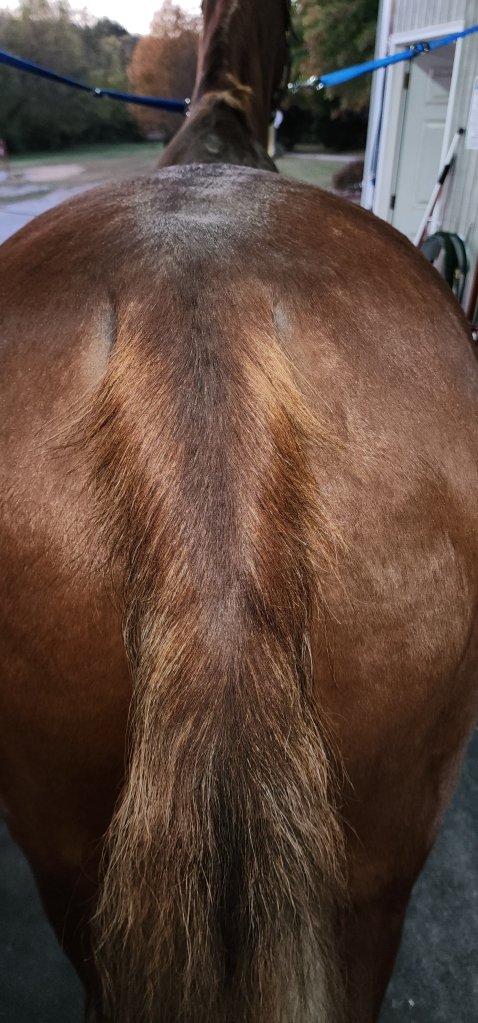
Enter this little stick of awesome. Just rub it on like you would deodorant in the spot(s) being rubbed and voila! I put it on once daily when I put the sheets on in the morning before turnout. They are usually outside sunrise to sunset. His hair started growing back within a week. After a month, it’s fully grown in. It looks a little weird being as the rest of his hair is bleached from before getting the sheets and the patch grew back unbleached black, but there is hair! Hallelujah! It is 9/18 and I’ve used 2 whole sticks at this point from August 8 to now, but that 13 dollars is worth every penny. I might as well buy a few cases of these things at this point.
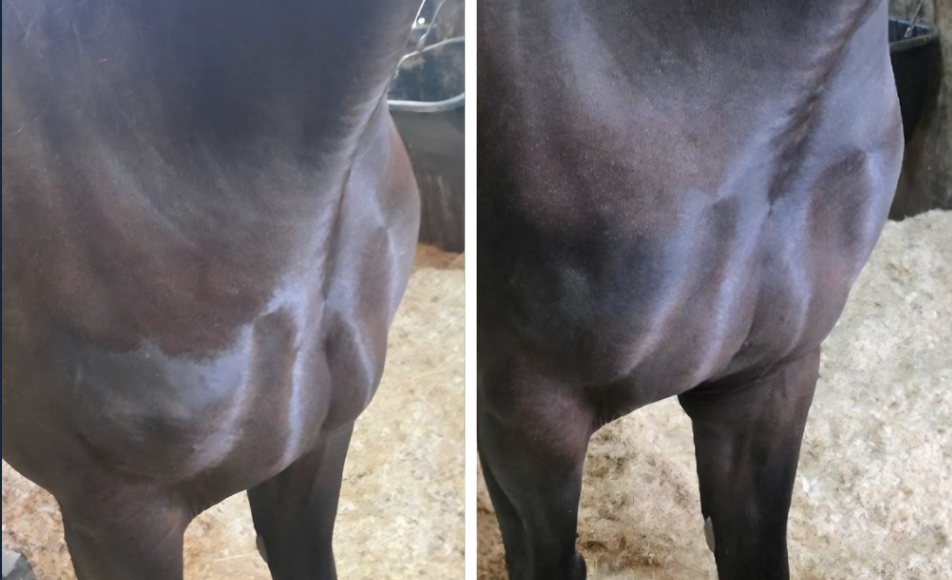
The photo on the left was taken August 7th. The one on the right was taken Sept 6th. The hair has completely come back in.
Just putting this out there, maybe someone somewhere will find this and it will help them and their horses from getting terrible blanket rubs!
Pretty tails… the bane of my existence. I love a long, thick, beautiful tail. However, I have struggled to grow one with the horses I have!! Fizz has finally started to grow a longer tail since I brought him home in 2022, but a lot of it grows WHITE. And, well…it doesn’t stay that way. No one likes a pee and dirt stained tail-send help. Duke’s tail grows like crazy, but he so angrily swats at flies he has ripped a lot of it out having it put up. The nice long part is so thin I want to cry every time I take it down and more hair falls out.
I have used many different style tail bags and even sewed my own and NONE of them have been great. The 3 strand ones, the lycra ones, biomane ones, generic canvas ones, I’ve put them up using a sock, using panty hose, using vet wrap, I’ve tried so many things. Props to you if you can get any of the aforementioned things to work really well, because I simply cannot seem to figure it out.
Being about at my wits end, I ordered the “Tail Boot” because why not, I’ve tried everything else!!
They arrived in short order and I set off washing tails. Let me just say, I might be a little slow because I had to watch the tail boot video a few times before I figured out the real life application of these things. It wasn’t (for me) a “plug and play” deal BUT, they’ve been on for several weeks now and I have had ZERO issues. No broken hair. The boots have not fallen off. No ripping, tearing, etc AND they have “swishers” so Duke can angry swat at every real and imaginary fly in existence.
The construction is really nice. The outer layer is neoprene with velcro to secure it. They swishers are made out of what appears to be baling twine. They are replaceable (you can purchase different colors from the tail boot website) or honestly, I figured if these got damaged I could just make about 12,000 new ones from all that hay string I hoard because I am so unhinged I think I may need it for something one day. There is an inner pouch attachment that holds the braided hair to help secure the boot onto the tail. They come in different standard sizes or they have an option to buy custom sizes, which would be nice for someone who has a horse with a really long, super thick tail or something that may not fit into a standard size category.
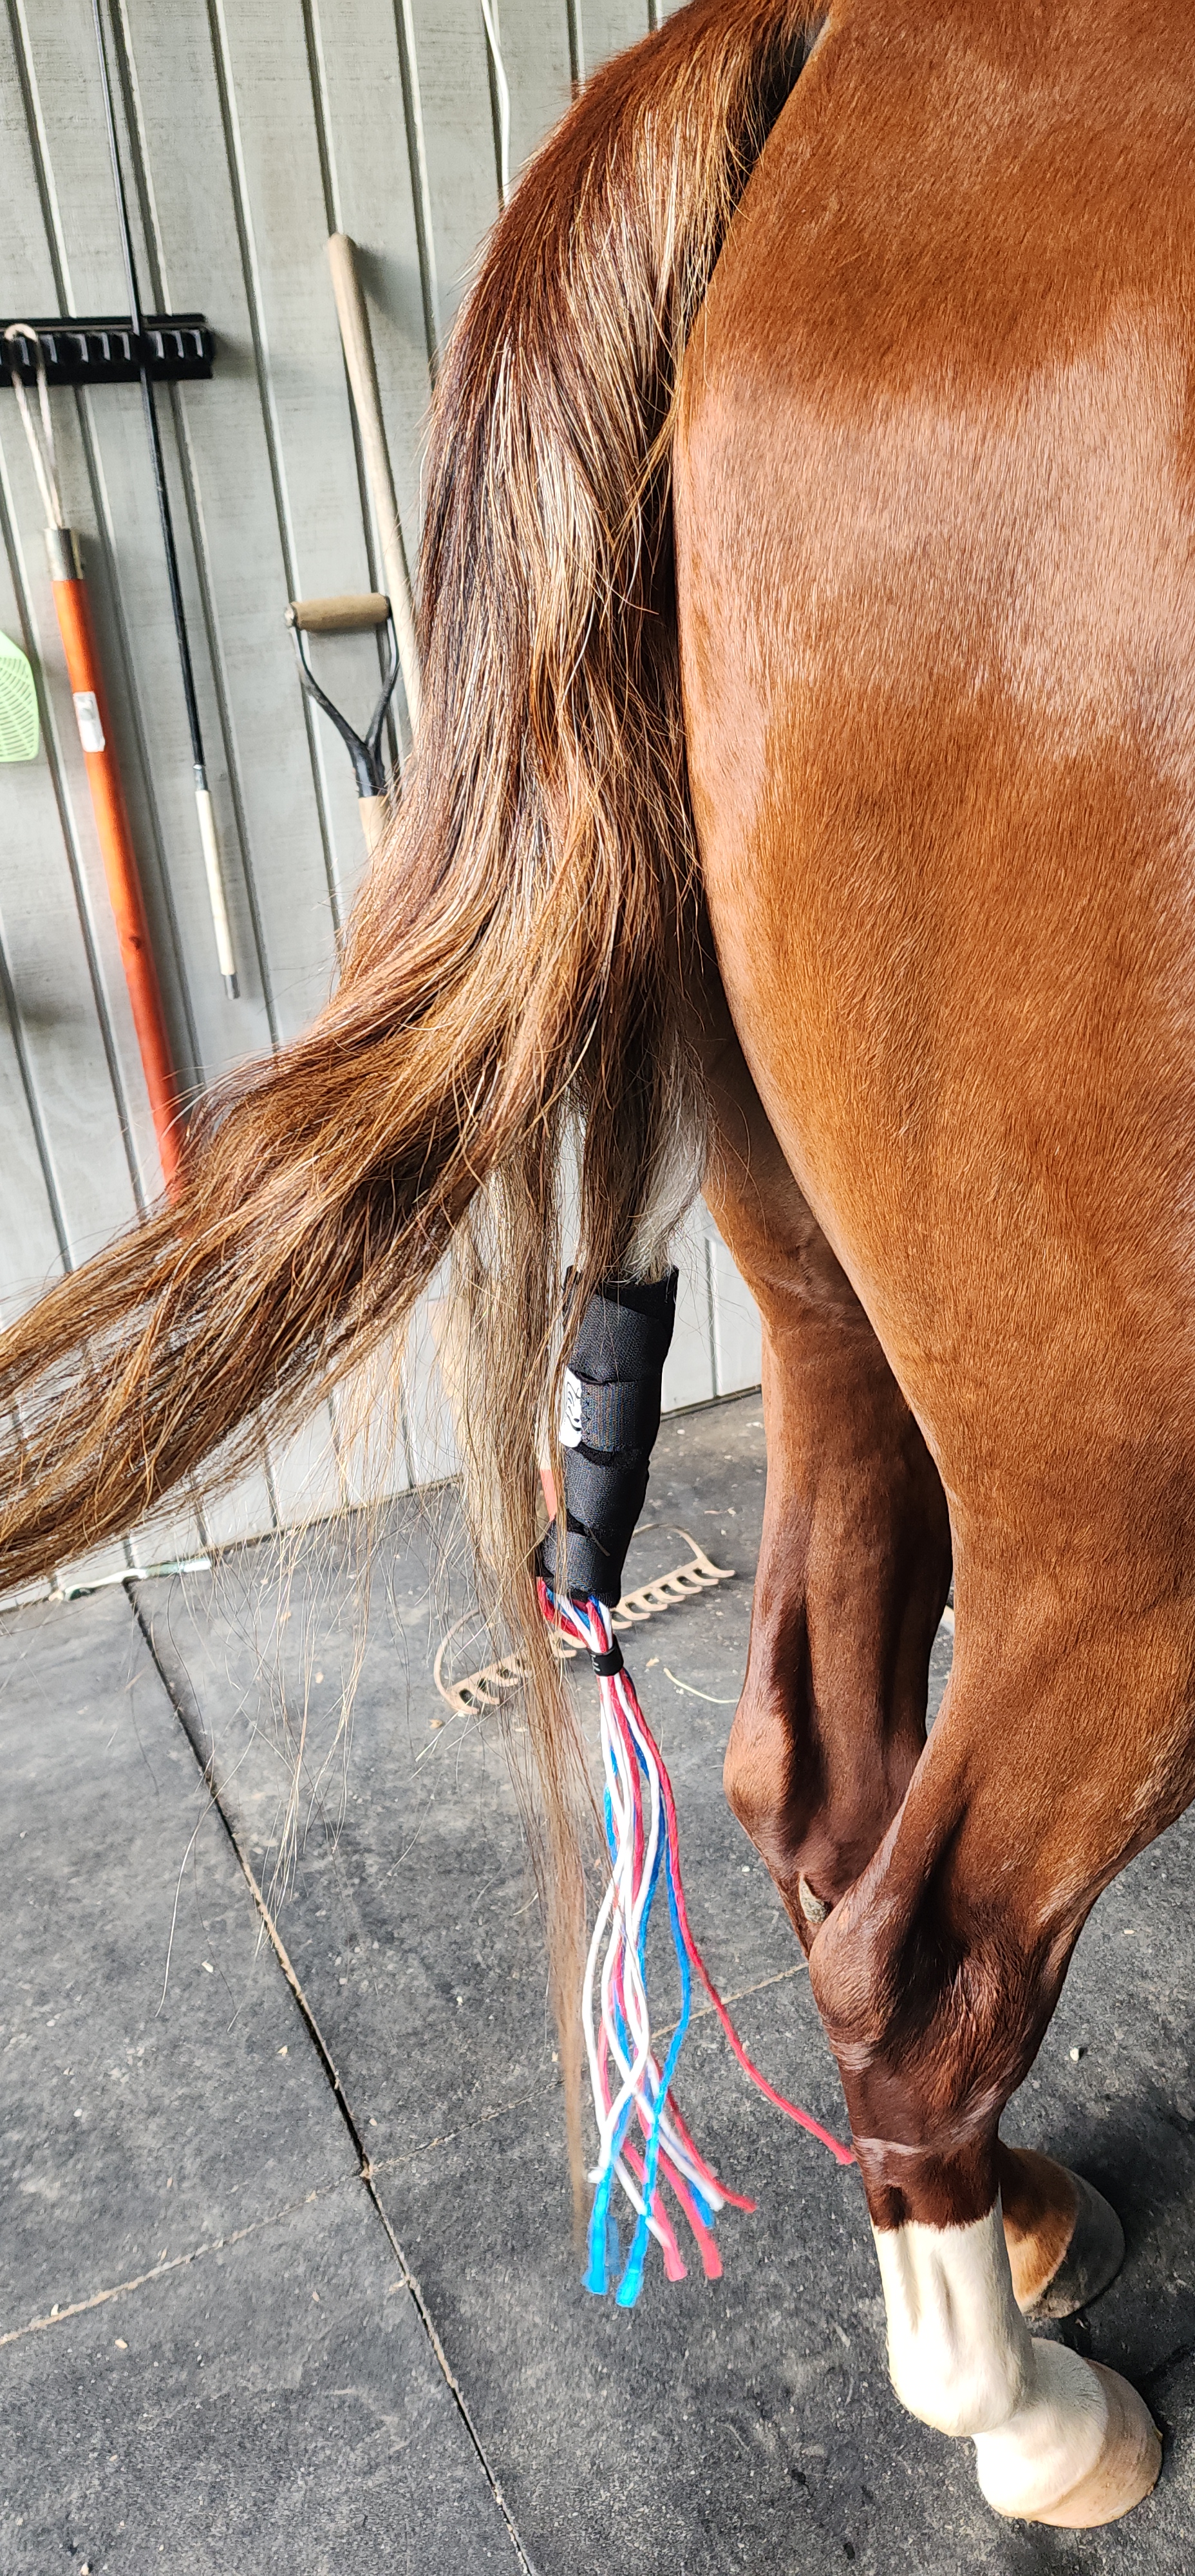
I ordered one size small (for Fizz’s shorter, not super thick tail) and one size medium (for Duke’s super long but pretty thin tail). Below you can see the difference in sizing. I almost needed to size Fizz’s up to the medium, but the small works for now. The medium was perfect for Duke, and has some room to spare if I am able to get his tail thicker.
The hardest part for me was figuring out how to get the tail in the little pouch inside the neoprene outer layer. Again, I might be a little slow. Despite any struggles I had with application, this is the feature I actually loved the most about these! It wraps over the braid to give the tail an extra layer of protection and helps secure the boot to the tail. It really is a very well thought out design.
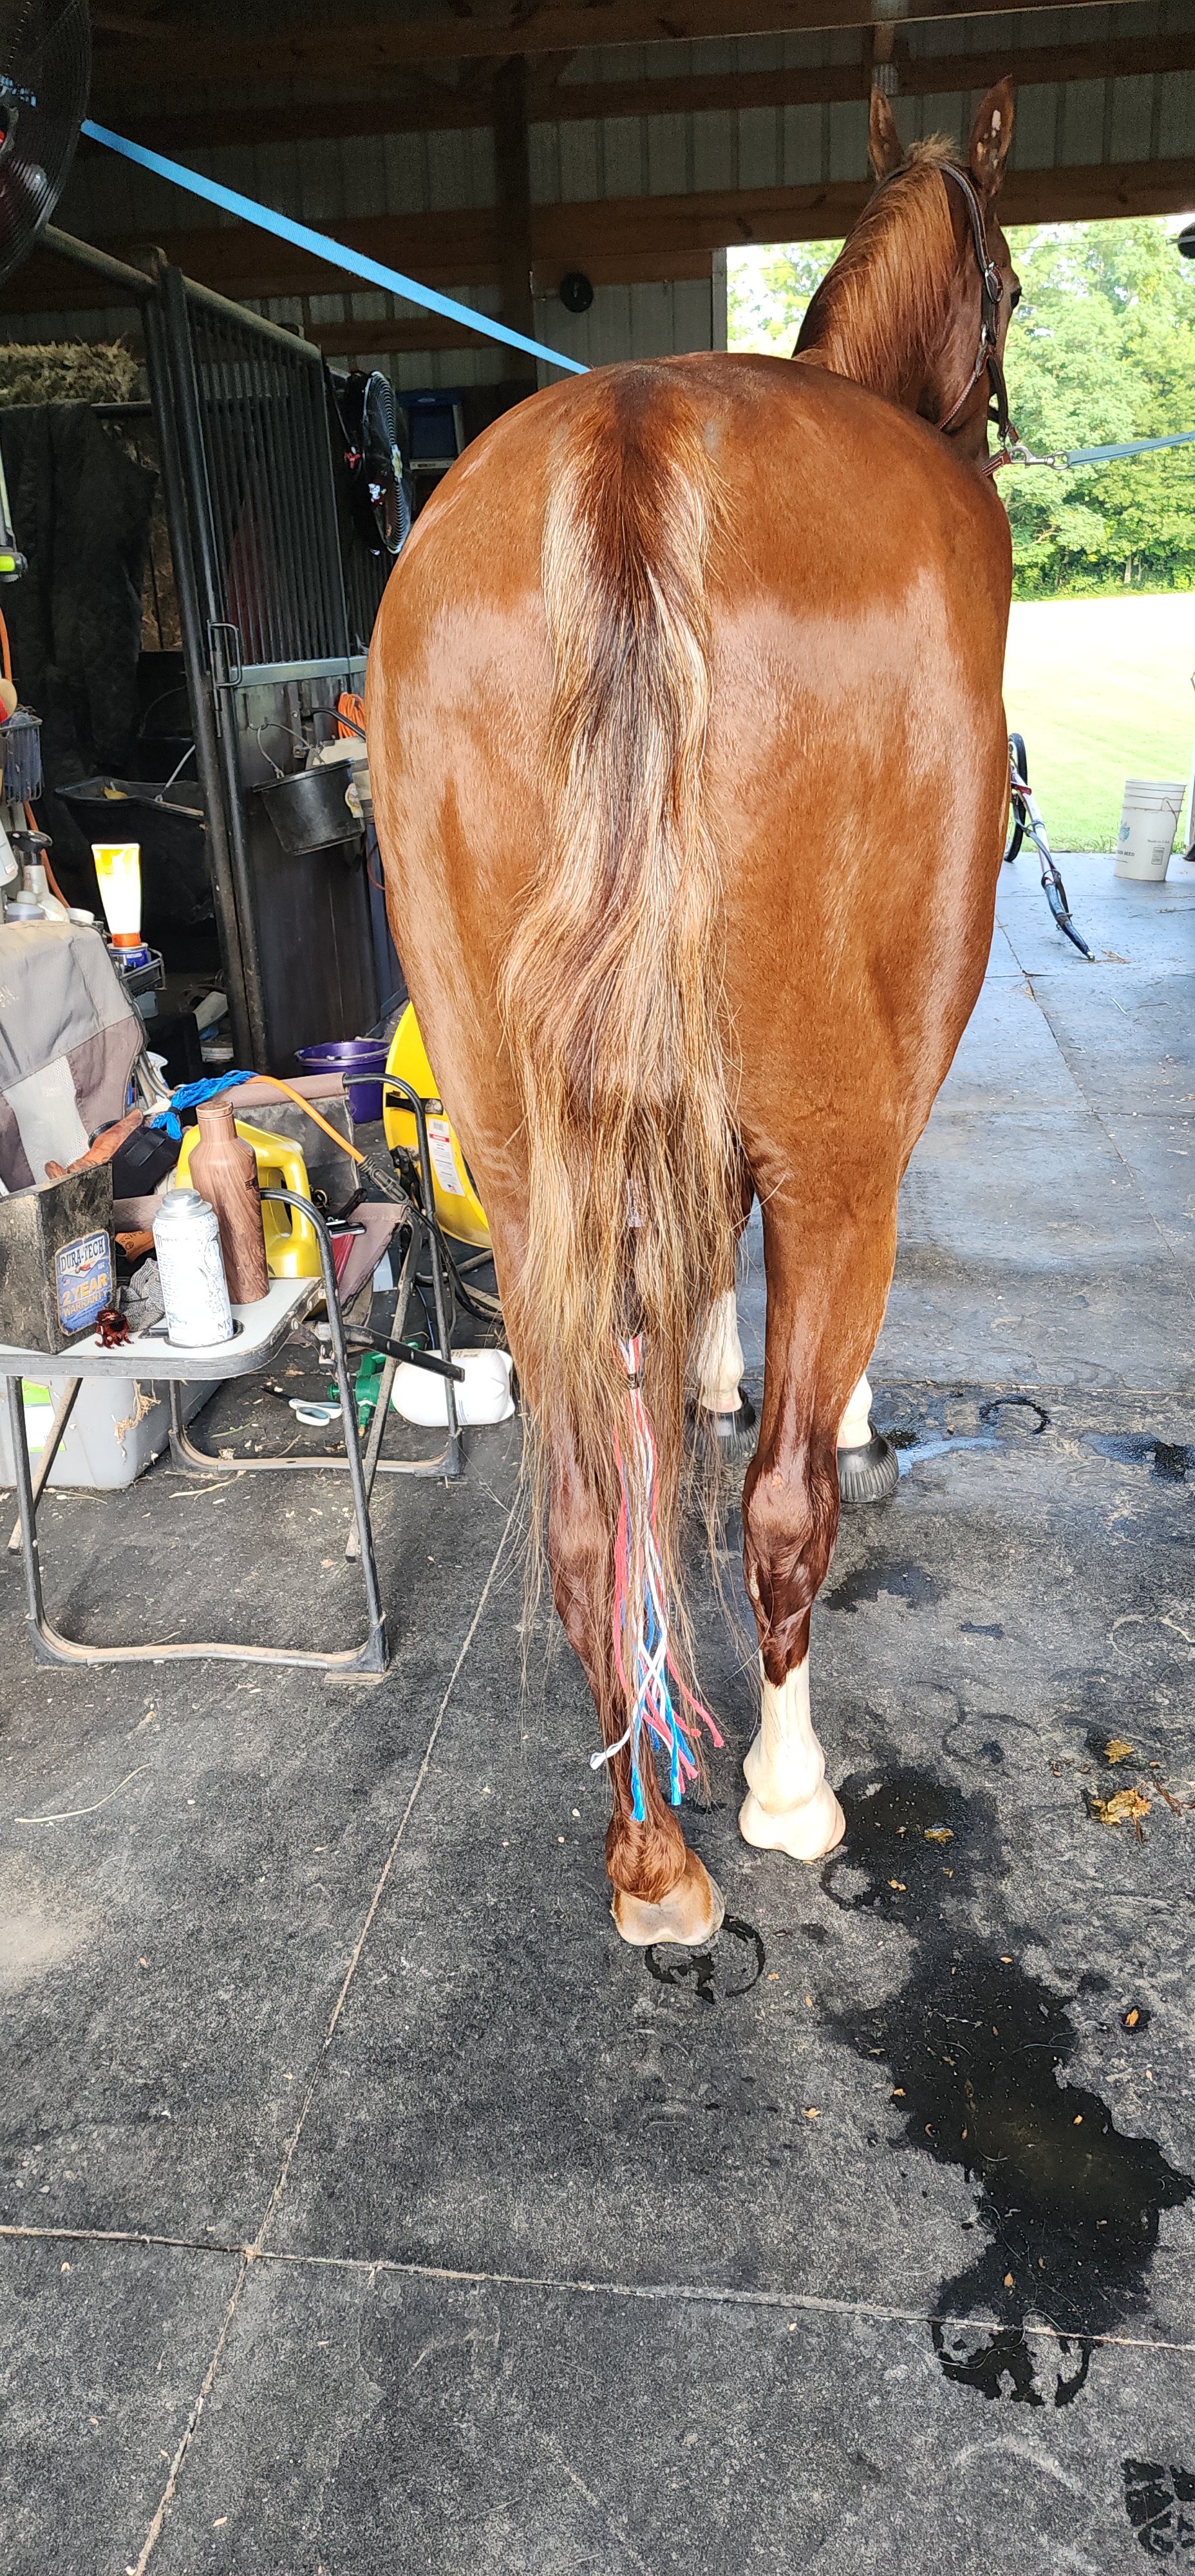
The natural tail (no boot) to how the boot looks once I applied it.
On the tail boot video, it shows braiding up the hair without leaving any feathers out. This goes against everything I’ve ever been taught about braiding tails and I just couldn’t bring myself to do it, so I only braided and put up the “bottom” part of the tail, the same way I’ve been doing since I was a little kid in 4-H. I’m not saying the other way doesn’t work, I’m just saying I am a creature of habit and leaving feathers out of a tail braid is one of the things I’m not capable of changing as a 40-something year old human.
Overall, big thumbs up to these tail boots! I really really like the design, they have (so far) held up really well, and they’ve kept the boys tails dry and clean even when I’ve been having to hose them down a lot due to the KY summer heat we’ve been experiencing lately. A word of advice though, try to steer clear of the swishers; I did not personally like being smacked across the face with a wad of hay string. But whatever, you do you!
If you’ve been following us for a while, you may have seen our Cavallo Simple Boots: An Initial Review back in 2016 when we got our first pair of hoof boots for Fizz. We have been a customer of Cavallo, Inc and a buyer of their products since! I have not ventured out to other brands because I have been happy with these so I really haven’t needed to. Cavallo is now offering their customers incentives for referring others to their brand. Since I am still a user of and believer in their product, I signed up for my own link to the incentive program! As a benefit, if you purchase from my link, you get 20% off your purchase! Just click here: Referral Program Link
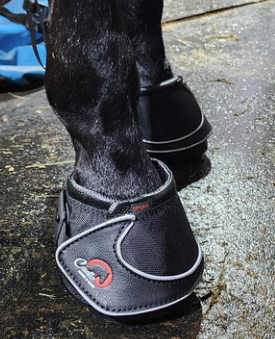
Fizz and Duke both have their own sets of 4 cavallos to wear when they are barefoot. While we don’t typically turn them out wearing them or work them in the round pen using the boots because the ground is usually pretty decent and the round pen sand is soft, there are times when we choose to use them consistently. We do always use them on any unshod foot when trail riding to protect their feet from this kind of disaster that happened a few years ago to Duke while trail riding with no protection on his rear feet.
After the above happened, that’s when both boys got new sets of cavallos for their rear feet. Duke’s “sports” when they were brand new!
A few weeks ago, we had a massive snow storm, followed by a massive ice storm, followed by more snow, and then it was frigid temps for several weeks following that. There was jagged ice everywhere, but I couldn’t bring myself to make the boys stay inside because I was scared for their safety. During this time, I opted to let the boys wear their cavallos on their front feet to protect them where they put the most weight and my hope was the treads on the boots would give them more/better traction and the pads would offer them some comfort/support on the hard surface. Incase you didn’t know, a horse carries approximately 60% of it’s body weight on the front feet.
Both boys have different setups and sizes. Fizz wears simple boots on the front and treks on the rear. Duke wears simple boots on the front and sports on the rear. Overall, I like the trek and sport closures better, but I bought the simple boots first and have not really had a reason to change them out. When (if) these things ever wear out (so far they’ve been really sturdy!) I will likely get treks or sports for their fronts as well, only because I think the closures are easier than the simple boots. You can see the differences in the image below. The treks are my personal favorite of these 3 if I’m being completely honest.
I also want to note, we have used them both barefoot and over shoes. You may need different sizing for either type of application (barefoot/over shoes) so make sure to measure to be safe before ordering. Fizz especially likes to be a wild man and he will overreach and clip his front shoes with his rear feet and bend/loosen/rip off his front shoes and he has damaged his heels this way too. If I notice a shoe is loose, bent, or otherwise in danger of getting ripped off in any way, I will stick his cavallos on to protect his feet and the shoes until the farrier can come fix the shoe. If you do this, make sure to put them on both sides (left and right) so the horse is able to stand/travel evenly. Just fronts or just rears should be OK as long as there is one on the left and right side on the same “end” of the horse so they don’t have to stand crooked. This should be common sense, but you know, sometimes we don’t think of things and just get in a rush to put a bandaid on something because, horses, so I feel like it’s worth mentioning. In instances where he has lost a shoe, I just add a few pad inserts to the inside of the boot going on the foot without a shoe and leave them out of the other to make up the height difference.
Both boys in their full sets of Cavallos! Happy as can be to go to work.
As for accessories offered by Cavallo: Both boys wear pads in their boots, front and rear (because I like the idea of some extra cushion) and we use both the pastern wraps and comfort sleeves. The pastern wraps I find a little more difficult to use, but they hold up better and in my opinion are better when there is moisture involved. If you’re trail riding where there will be a creek or mud, the neoprene pastern wraps would by my choice. They hold some moisture, but it seems to be more wicking away from their skin and they keep their nice sturdy form around the foot. The comfort sleeves are more like a cotton sock. They are so easy to use and very convenient while still offering protection for the pasterns and heel bulbs. It’s just when they get wet, they get soggy like wet socks. I personally don’t prefer wet socks so I don’t like them on my horses either. The protection is the same and the horses don’t care, it’s just my personal preferences based on the experiences I’ve had with both items! I use the sleeves when it’s dry, I’ll be riding in dry places, and I know they won’t get wet. Take that with a grain of salt and do with the info what you will. You can see the differences in those items in the image below.
So, after 9 years of using Cavallo hoof boots, I can say with confidence that these are boots I would recommend and here are some of the reasons why, among many others that I am probably not thinking of right now.
There are so many different styles to meet your needs and preferences in style
They are well made
They are durable
They are easy to use
They help keep the horses comfortable and protected
You guys, I have a confession. I am a muck rake destroyer. I am hard on things-muck rakes included. I use the muck rake (and many other things) in ways they are not intended. I tried to stab a mouse with one the other day-I was unsuccessful, but dangit, get out of my barn my guy – this is not your home. I scratch my horses with them. I pick poo from fields with them, and I have been known to use it as a “hiking stick” around the paddocks. I have nicely level, deeply bedded and fully matted stalls, but in 2 years I have broken tines off at least 6 or 8 muck forks somehow. The entire head isn’t exactly cheap to replace depending on the ones you like, but it’s horribly annoying to use one with a tine missing. I just cannot make myself use one that isn’t whole. I know, plenty of people can, but I am not one of them.
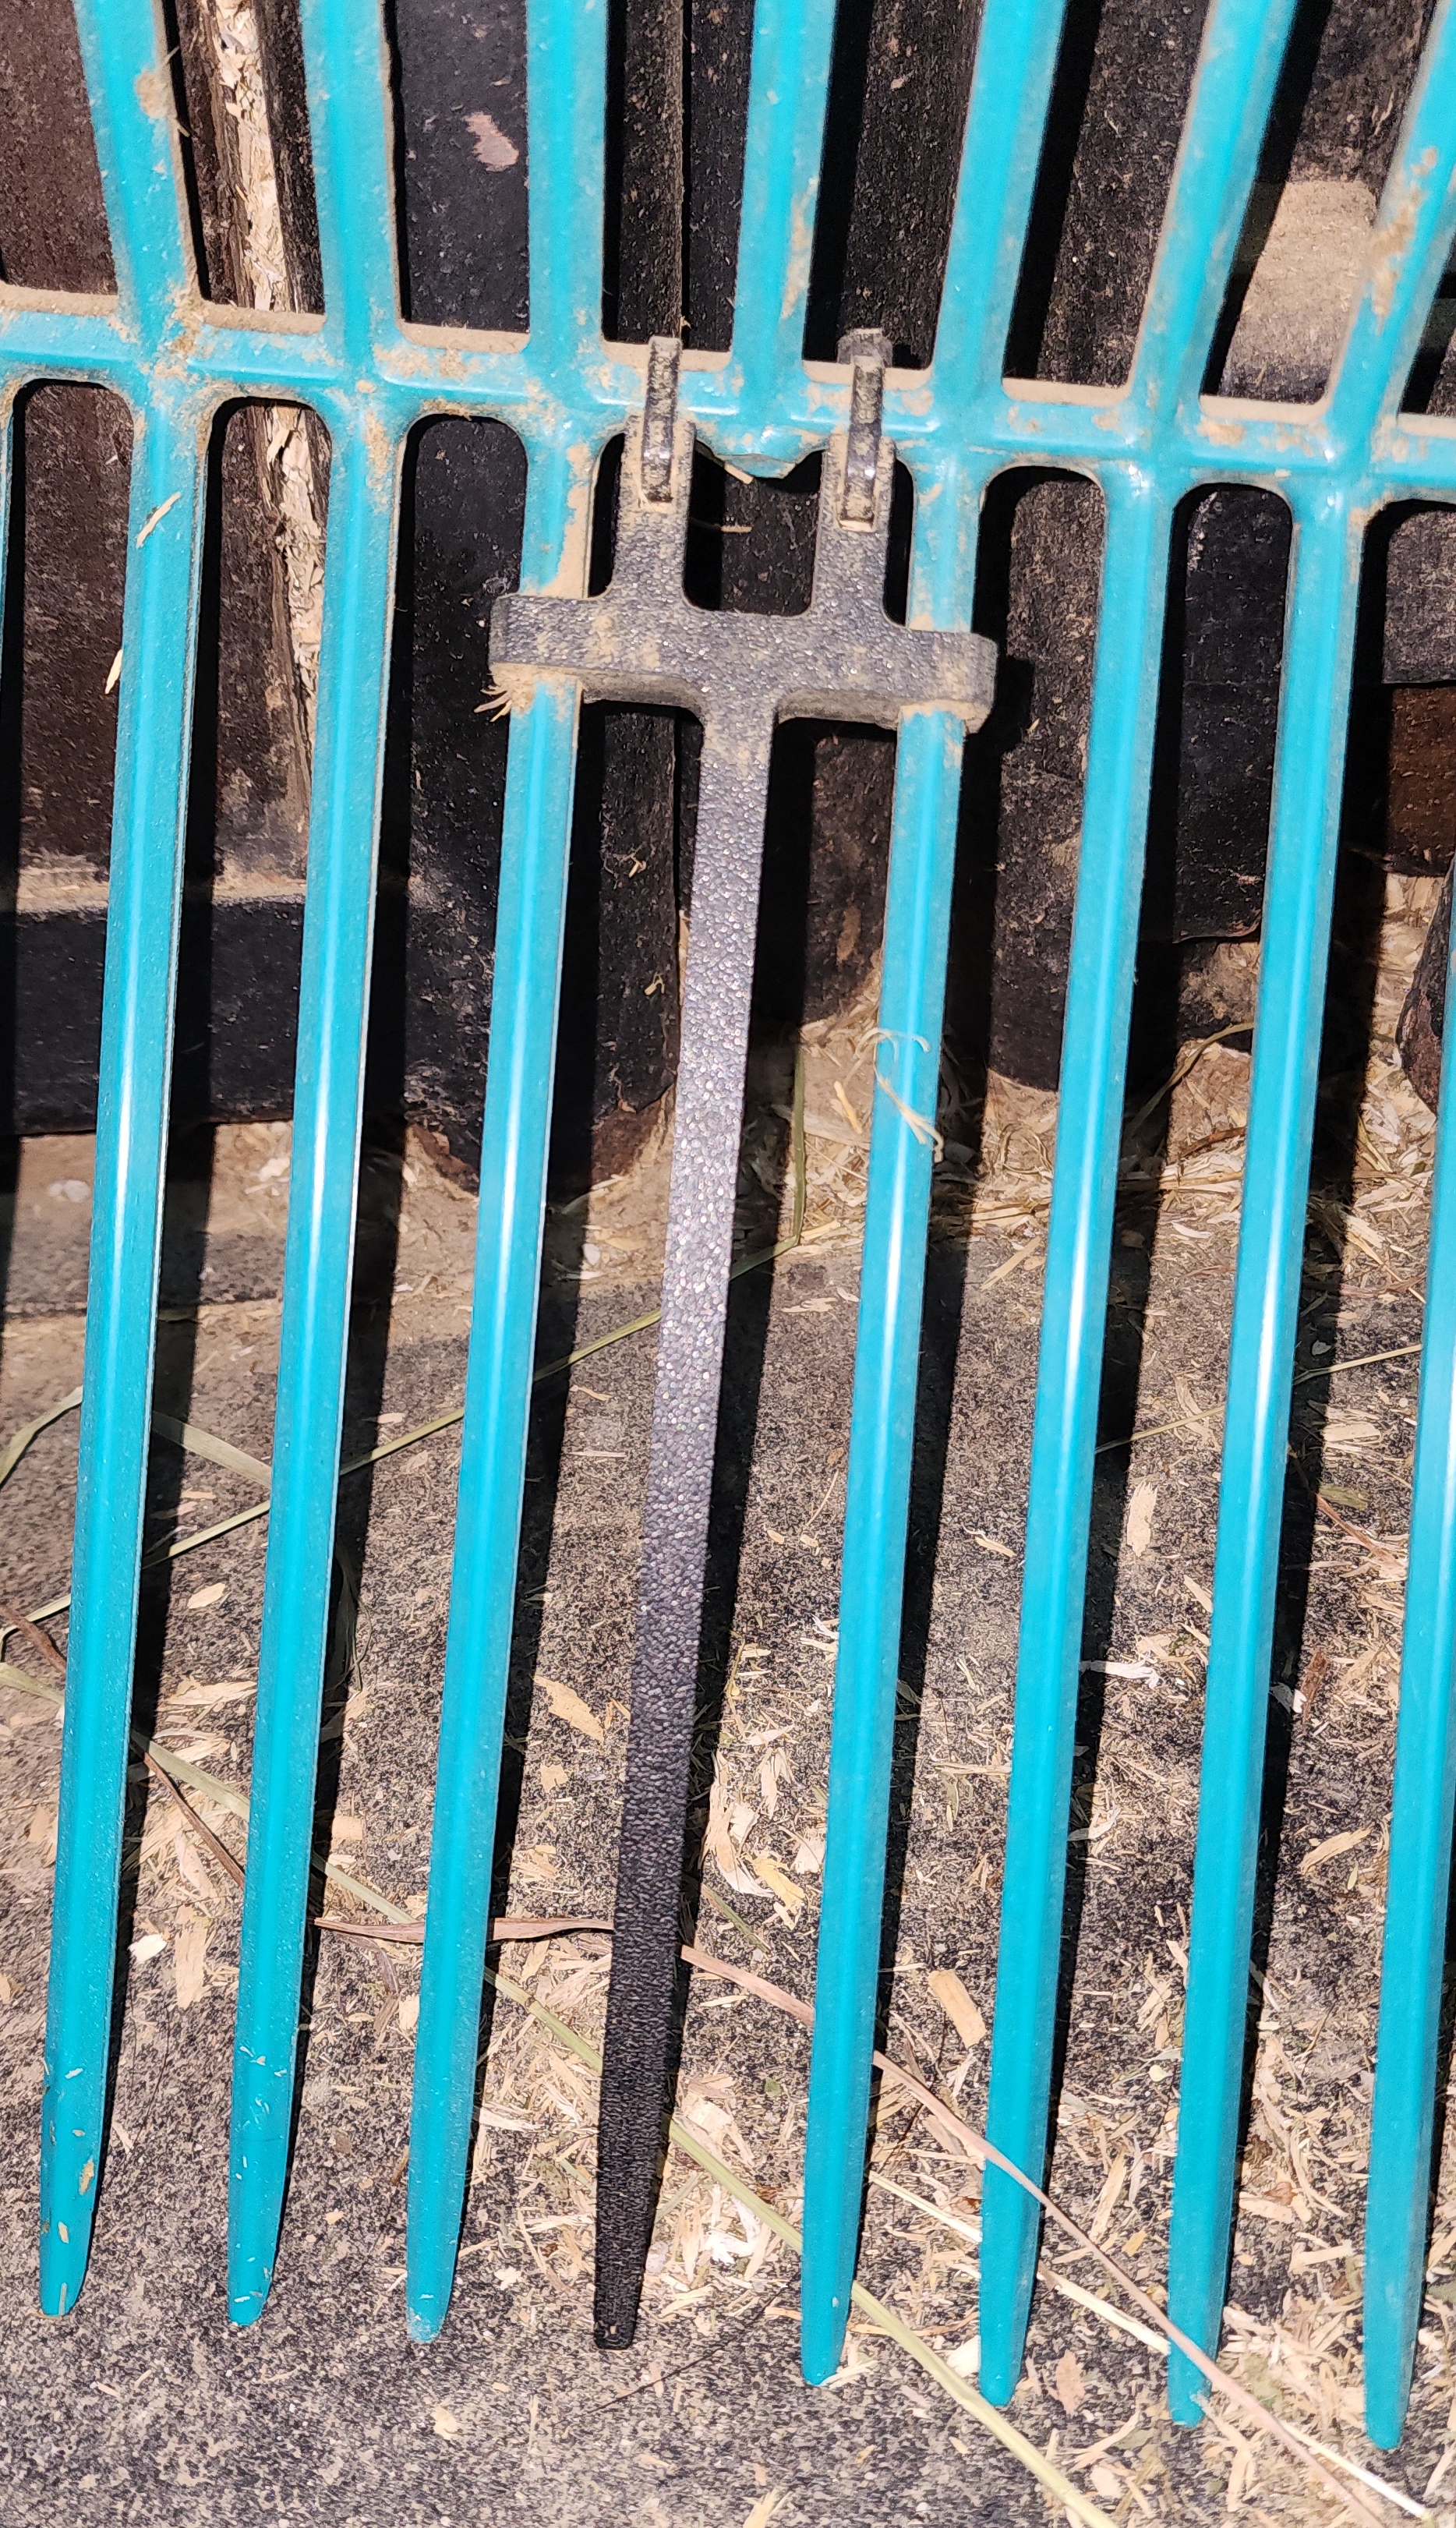
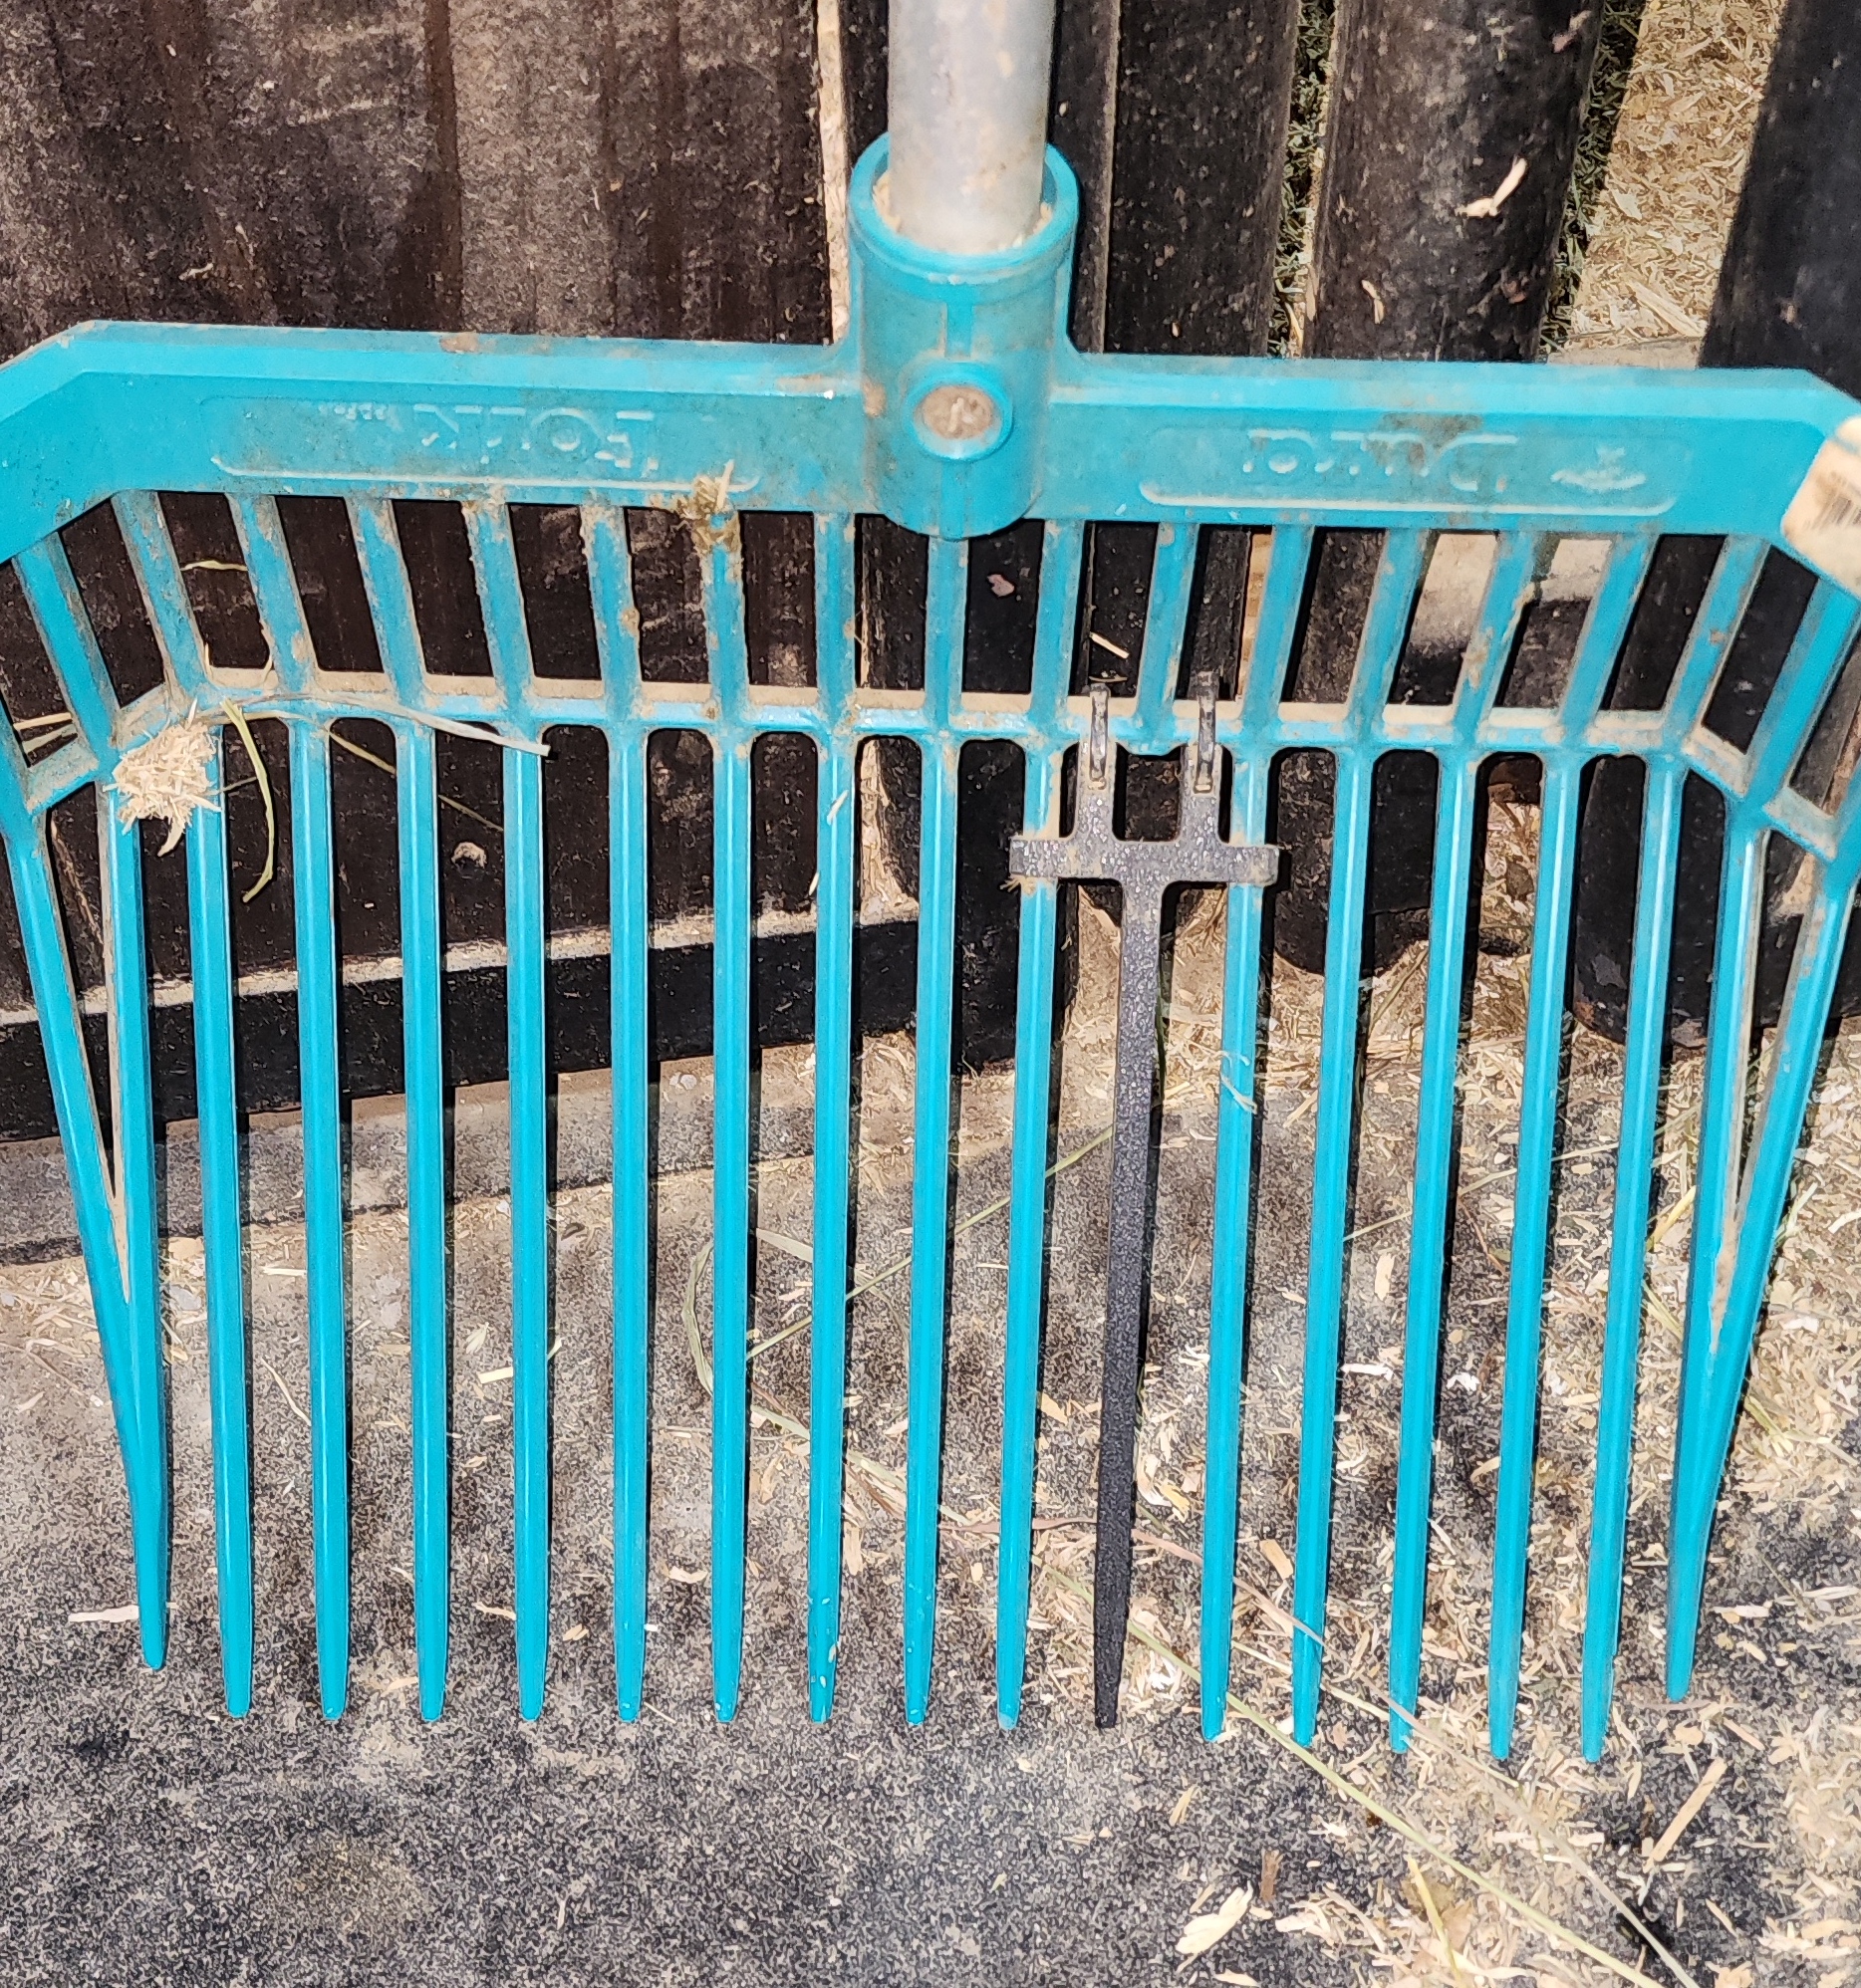
Enter the It’s About Tine! muck rake replacement tines. Manufactured by by It’s about Tine, LLC, they are (at least for me) a game changer!!!! As usual with the reviews here, I am not affiliated with nor compensated by this company or product, but I do feel compelled to share my experiences with my followers so you guys can see how products have worked for us.
It is exactly what it says it is. A replacement, for your individual (or double) broken tines on your muck rake. I saw these shared on facebook somewhere, so I got a few to try and added them to 3 different muck rakes. I have used one of those every single day for several months now. It is just like using one that isn’t broken, and the replacement tine has also stayed intact! They are easy to install and work like a charm, so satisfying not to have to replace the entire head.
Do yourself a favor and check them out. Bonus, they are a USA veteran owned company!! This company especially pulls at me to support them since my husband is a United States Marine, but it doesn’t hurt that their product is useful, inexpensive, and WORKS. Ooh Rah!
I will start this like most of my reviews. I am not in any way affiliated with or compensated by this company (or any other companies I review) for saying the things I say.
I follow a group on Facebook that pertains to grooming horses, show prep, coat, mane, and tail maintenance, etc. There are a lot of folks on there with feathered breeds, who have long, thick manes and tails and I have seen them recommend this product many times. I’ve seen their before and after photos. And for a while wondered, “how could this product help my boys?”
Fizz struggles with growing his tail. I have owned him for over 10 years and his tail has barely gotten longer than it was when he was 4. And he hopelessly rubs it, so his tail “feathers” are just… Sad. I made my first order directly from the Mane-ly long website on Sept 4. It came pretty quickly. I only ordered small versions of their shampoo, conditioner, and polisher/detangler to get me started and try it out. The stuff is pretty expensive after all, and I wasn’t sure how well I would like it or if it would work any better than anything else I’ve ever tried.
Day 1: Here is what Fizz’s tail looked like. sorry I don’t have better photos, I didn’t really think I’d be writing a review.
I have since washed, conditioned, and detangled it twice. Every few days, I rub in the “shock” treatment, which is a half and half mix of the conditioner and detangler/polisher.
After using this product for the last 2-ish months, here is what his tail looked like on 10/20/23. I have done nothing different aside from using Mane-ly long products in it. It appears longer and thicker, and while he does still rub it here and there, he is not viciously rubbing it at every opportunity he gets. I assume this is because the conditioner keeps it from being dry, so it’s less itchy? When he does rub it, the hairs don’t seem to break off nearly as bad. They ARE growing. Slowly but surely. And I consider that a win.
Over the summer (and I don’t have photos of this unfortunately) the top of his tailbone was almost rubbed raw he was rubbing so bad. The feathers on the tops and sides of his tail looked like I had shaved them. I wish I had taken photos of that!
I’m also using the products on Duke, who has a long, thick, pretty nice tail. I braid and bag Dukes tail, but he swats at flies and wrings his tail like he’s a dang helicopter about to take off. I was struggling to keep it unmatted at the top portion between the tail bone and where the braid starts. I spent so much time picking through it with other sticky detanglers with not a lot of success. The manely detangler is not super sticky, it seems to soak into the hair, and it works. I use the “shock” about every 3-4 days (about a quarter size drop, a little goes a long way) and so far, it’s kept it unmatted!
I’ll continue to take and post photos of the progress and post them here when I can, but so far, I am pretty impressed with these products. Expensive, yes. But they are working for us. And a bonus, his tail always smells really nice.
As a horse owner, you are the advocate for your horses wellbeing. You are the person in charge of making decisions regarding their care and the providers for that care. You are the person in charge of their tack, their equipment, their wardrobe, their diet, everything. At the very minimum, you choose who is in charge of choosing those things (in a boarding/training situation) and you need to be able to trust that person or people. You are your horses voice. But, don’t they get a say?
If your normally well behaved horse suddenly starts throwing fits over something repeatedly, listen. Its easy when you have a golden child who you know inside and out to decipher when something is off and start investigating. If you have a sensitive, reactive horse however, it is easier to overlook things they’re trying to tell you as they’re just being dramatic, again.
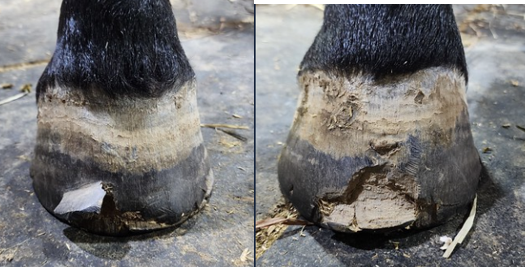
But listen y’all. Dramatic horses still speak. I have a drama queen. He’s called Duke and he is the most sensitive creature. For the last year we have been fighting with his feet. His feet which had not been overly problematic before. If you recall, I made a previous post with a review for Keratex Hoof Hardener and how it had helped his crumbling feet. This was right after they came here. Then the stubborn abscess happened last fall. And we’ve been on again off again lame post shoeing since.
Let me tell you about Duke. He’s a Nervous Nelly. Anytime he’s nervous, he runs around shooting turds out like they’re some kind of ammo to ward off the things causing him to panic. It’s easy to laugh but at the same time, he’s speaking. He’s telling you that to him, something isn’t right, something is scary or he is otherwise uncomfortable. Based on the fact that since I’ve known him, he’s been afraid of his own shadow, I didn’t really blink an eye when he would immediately start the pacing/pooping process when the farrier showed up. He would proceed back to it after being shod and continue up until the farrier left. I just figured “another thing he’s being dramatic about” and moved on.
I had used the same farrier since the horses came home with me in July of 2022. From the beginning, Duke had on again off again lameness and hoof issues, which had been attributed to his sensitivity, poor hoof quality, genetics, etc. He’s been on a hoof supplement for the entire time he’s been here. June/July 2023 rolls around and the farrier reschedules 3 times. Dukes toes were crumbling by the time he finally came at a little past 10 weeks, and he was lame immediately after the reset. The farrier would not come back to check him. I was able to get a stand-in farrier to come remove the shoe and found there was a hot nail (dried blood in the nail hole on the lame foot). He showed immediate relief, and he was barefoot on that hoof until his next reset (about 4 weeks) since I was not able to get the stand-in farrier or regular one to come back before the next appointment. At the last appointment, the farrier insisted putting on a more expensive, heavier shoe on already compromised feet. He also attempted to put mesh and “hide” a piece of lead with it, knowing that is illegal for the division I told him we would be showing in. I seriously began looking for a new regular farrier at that point. I can forgive a lot of things, but putting my horses wellbeing in jeopardy is NOT one of them. Willingness to cheat/lie (and charge me more for it!) is also not on the list of things I am willing to overlook.
Enter NEW farrier. Pulls up. Checks out Duke. Reset. SOUND. And you guys. He stood there. BEFORE, DURING, AND AFTER, and he stood NICELY-which has literally never happened. He never once rocket launched turds or acted nervous in ANY way whatsoever while this farrier was at the barn. Excuse me new farrier. What voodoo magic sorcery have you used on this horse? Second appointment, same… Sound and happy.
We are now dealing with repairing the damage left by the previous farriers poor choices. Duke is barefoot. Again. Not by choice but by necessity. And hopefully his one “bad” foot can truly heal this time and all 4 can improve. Below, the top image is what forced us into going barefoot. The second image is what his feet look like barefoot. He’s currently wearing Cavallo simple boots (which I reviewed years ago here) any time he’s turned out or if he is being worked. He’s comfortable in them, with zero signs of any lameness.
Look, I’m not saying the previous farrier caused the abscess, abscesses happen. I’m just stating this horse did not have a history of abscesses. A years worth of one farrier working on him, he was lame after being reset almost every time, at least for several days and sometimes several weeks. I am not saying it was 100% his fault Duke was lame a lot. What I am saying is that he did not previously have a history of being lame post farrier work. Until he did, with this particular farrier. What I am saying is that he, twice now, has been sound post farrier work with someone new. I’m not saying Duke is an Angel nor a Demon, but he stood like a Demon for one farrier and like an Angel for another. He was nervous around one, but not the other.
Moral of the story, listen to your horses. Even your sensitive ones. Be an advocate for them, an advocate for change. Notice things and adjust to try for a more desirable outcome. Change care providers. Tack. Feed. Methods. ANYTHING you think might make a positive difference. At the end of the day, if no difference is made, you can always pivot back to where you started (as long as you behave in a professional manner and don’t burn bridges like a savage jerk).
Dear Duke, I am sorry it took me so long to listen to you. I wish I had done so sooner, but rest assured now changes have been made and we are moving forward. Thank you for tolerating me, humoring me, and relentlessly being “loud” to the point where I had no choice but to listen. Love Always, your loyal servant and supporter.
A subject you don’t find details on often, because it varies greatly from horse to horse and location to location. However, it’s something anyone looking to own a horse or multiple horses needs to consider in detail before purchasing and deciding how/where to keep their horse(s). This will vary by area and cost of hay and other items in your area, but we are in Kentucky, and these costs are based on that. I encourage anyone looking at this to research costs of hay, feeds, and other items in their specific area so they can add up costs specific to their location. I am an advocate for transparency in the horse industry, so I am sharing my specific costs as a way to help others put a dollar amount to basic horse ownership. If you know up front, you’ll be better prepared to maintain your horses and not get into a situation where you can’t keep up with their basic needs.
If you are boarding and think the monthly boarding fee is outrageous, consider what is included and everything you do not personally have to do no matter if you are healthy, sick, injured, tired, busy, etc. The actual dollar amount is not indicative of the actual cost of boarding.
In the case where you’re doing it yourself “at home”, here’s what you’re going to be looking at as a SIMPLE feeding plan cost for a 1000 lb easy keeper who requires no supplements or “grain” to maintain weight. This is the base of my feeding program and equates to around $1700 a year for one, approximately 1000 lb horse. This assumes they need NO GRAIN and NO SUPPLEMENTS, which, 98% of the time is not the case. A ration balancer, at minimum, should be fed to ensure they get the right balance of minerals for their body, skin, hoof, and other health needs.
Any feed or grain needs to maintain a healthy horse or preferred supplements (as either required or preferred) of course add additional cost to any feeding program. Most competition horses of average age will require some form of maintenance in the form of additional feed and/or supplement(s). If you have a growing foal, pregnant mare, horse in hard daily work, or a retired pasture puff /horse otherwise not in work, their needs will be very different and based on each individual.
Below is a complete representation of what they are currently being fed (and doing well on) and the costs involved. Note this is the Fall/Winter costs (Oct-March). Every year when I get a new batch of hay, I have our local extension office come out and pull samples to send for testing. Once I have the testing numbers, I use FeedXL to balance their supplements to fill the gaps where their hay/forage is lacking. It’s not 100% accurate, but it’s a less expensive alternative to hiring a nutritionist and it’s easier than learning how to calculate all their needs myself.
Also to note, April-Sept they are on a product called Multifly to control the fly population and keep them (and us) more comfortable. We started this late in 2023 (In July) and I will possibly do a review later but it WORKED so we started it in April 2024 and continued through October. That adds approximately $10/monthly per horse.
So, all in all, these 2 horses cost me approximately ~$7000 combined annually to feed assuming nothing changes. This is ONLY what they EAT.
Am I certain there are cheaper ways to feed? Yes. Could I probably cut out some of the extras (oil, etc) also yes. But I feed what I prefer for the results I want to see and the performance I expect to get out of my horses and this is what is working for us. I have changed a lot of things over the last 3 years to find what works for me. It may not work for everyone and there are a ton of products that may work just as well, or possibly better. This is where we are right now. It’s subject to change. As long as my horses are happy and healthy, have shiny coats and quality hoof (which lets face it, has been a struggle for us in the past) I will be satisfied with their feed program and not likely to change much.
If you’re interested in overall cost of horse ownership, factor in every approximately 6 week trims/shoeing, minimum of once a year vaccines/wellness exam (most veterinarians require you to be a current client in order to address any emergencies/after hours needs), a contingency amount for any emergencies that may pop up, and insurance on your animal(s) if you so choose, etc.
Annual Wellness exam with necessary vaccines, dentals, sheath cleaning, coggins, state health certification, etc. from my vet is approximately $1200 for both horses.
4 foot shoeing with my farrier is $120
This is assuming they have no special shoeing requirements (corrective shoeing, pads, etc), and I don’t have to call the farrier back to put shoes back on during their cycle, which can add cost.
Barefoot trims are $60 (I let them be barefoot in the winter if at all possible)
I pay an annual premium of approximately $1200 for both horses to be insured (Major Medical and Mortality)
This is assuming the horses are kept on your property, and not considering any improvements, maintenance, or other costs associated with having them there such as halters, lead ropes, fly masks/sheets, turnout/stable sheets and/or blankets, coolers, shampoos, brushes, bridles, saddles, or any other tack/equipment necessary.
Lets assume for the sake of easy math, they are shod year round, have no medical emergencies, and require no additional medical/health maintenance. To feed and maintain very basic care of 2 healthy horses, it costs me around $10,500 annually, which is about $875 per month.
Those of you who have been following this for a long time probably remember the posts here about bringing the boys home. Can you believe it’s been (over) a year now? I can’t. What do they say? Time flies when you’re having fun? Or having… all the work to do? Or something like that.
I have managed to keep my horses alive and major incident free for a year. By major incident I mean we have not had any significant health problems or issues and we have needed little vet care but I don’t mean we have had zero issues. You guys realize my horses are animals with a sense of humor that love to watch me squirm and panic, right? So here are the things I have learned over the past year having horses at home.
Having horses at home is an absolute blessing and it’s so cool to just watch them live, breathe, eat, etc. There’s nothing like the sound of horses happily munching hay.
If you should be blessed with horses that have as much personality as mine, you could likely create a youtube or something and make money off their antics. I am not that creative, but I have thought about it. They are hysterical and I laugh, a LOT.
You better prepare yourself to fill your entire phone with photos and videos of all the things they do. Or have some self-control, which I do not possess when it comes to them (or the dog, for that matter). Zero pictures of the husband and I. ALLLLLL the pictures of the horses and dog.
If you haven’t spent time in the barn in your pajamas or bath robe, you’re probably doing it wrong or haven’t had horses at home long enough.
You will 10000% spend more time working in the barn and managing the horses than you will riding or working the horses
Barn chores wait for no one. It doesn’t matter if you are busy, sick, hospitalized, out of town, or just lazy, etc. The chores still have to get done. Someone has to do them. If you can’t, you better find someone who can.
Going out of town is a thing that requires much planning and effort, and you will worry the whole time about your horses.
Horses are accidents waiting to happen.
Pro tip: get annuals to keep in good standing as a current client with a vet. Otherwise, you may not be able to get care in an emergency.
Don’t think you are above having an emergency. Your horse(s) will prove you wrong.
They WILL get loose at some point. Have a plan. Or run around like a complete fool trying to contain them. I’ve done both.
Your barn will never be clean. Ever. Horses are gross. You will never 100% get rid of all the dust or grime they bring.
Take all the things you thought you needed, and add more things you never knew even existed. Then you still won’t have everything you need for horses.
There is no such thing as too much tack or too many bits.
A leaf blower has many uses far and above blowing leaves, and is a great thing for barn use
Cobwebs. They refuse to go away no matter how many times you swipe them down with a broom. Just, WHY?
Your permanent accessory is now hay. Hay in your hair. Hay on your clothes. Hay in your pockets, down your pants, in your gloves, in your boots, in your underwear, literally everywhere. Feel something stabbing you in the middle of the night in your bed? Hay. How did it even get there? Hay goblins-I don’t know. But it does.
If your horses wear shoes, it will take an act of God to keep them on if they are on lots of turnout. But lots of turnout is good for their brains. It’s a double edged sword.
Speaking of shoes, pray for a good farrier. A consistent one. A true horseman who won’t charge you a zillion dollars, but also treats you and your horses well and SHOWS UP when you need them. Level of difficulty: Expert. Godspeed. Finding that unicorn is near impossible.
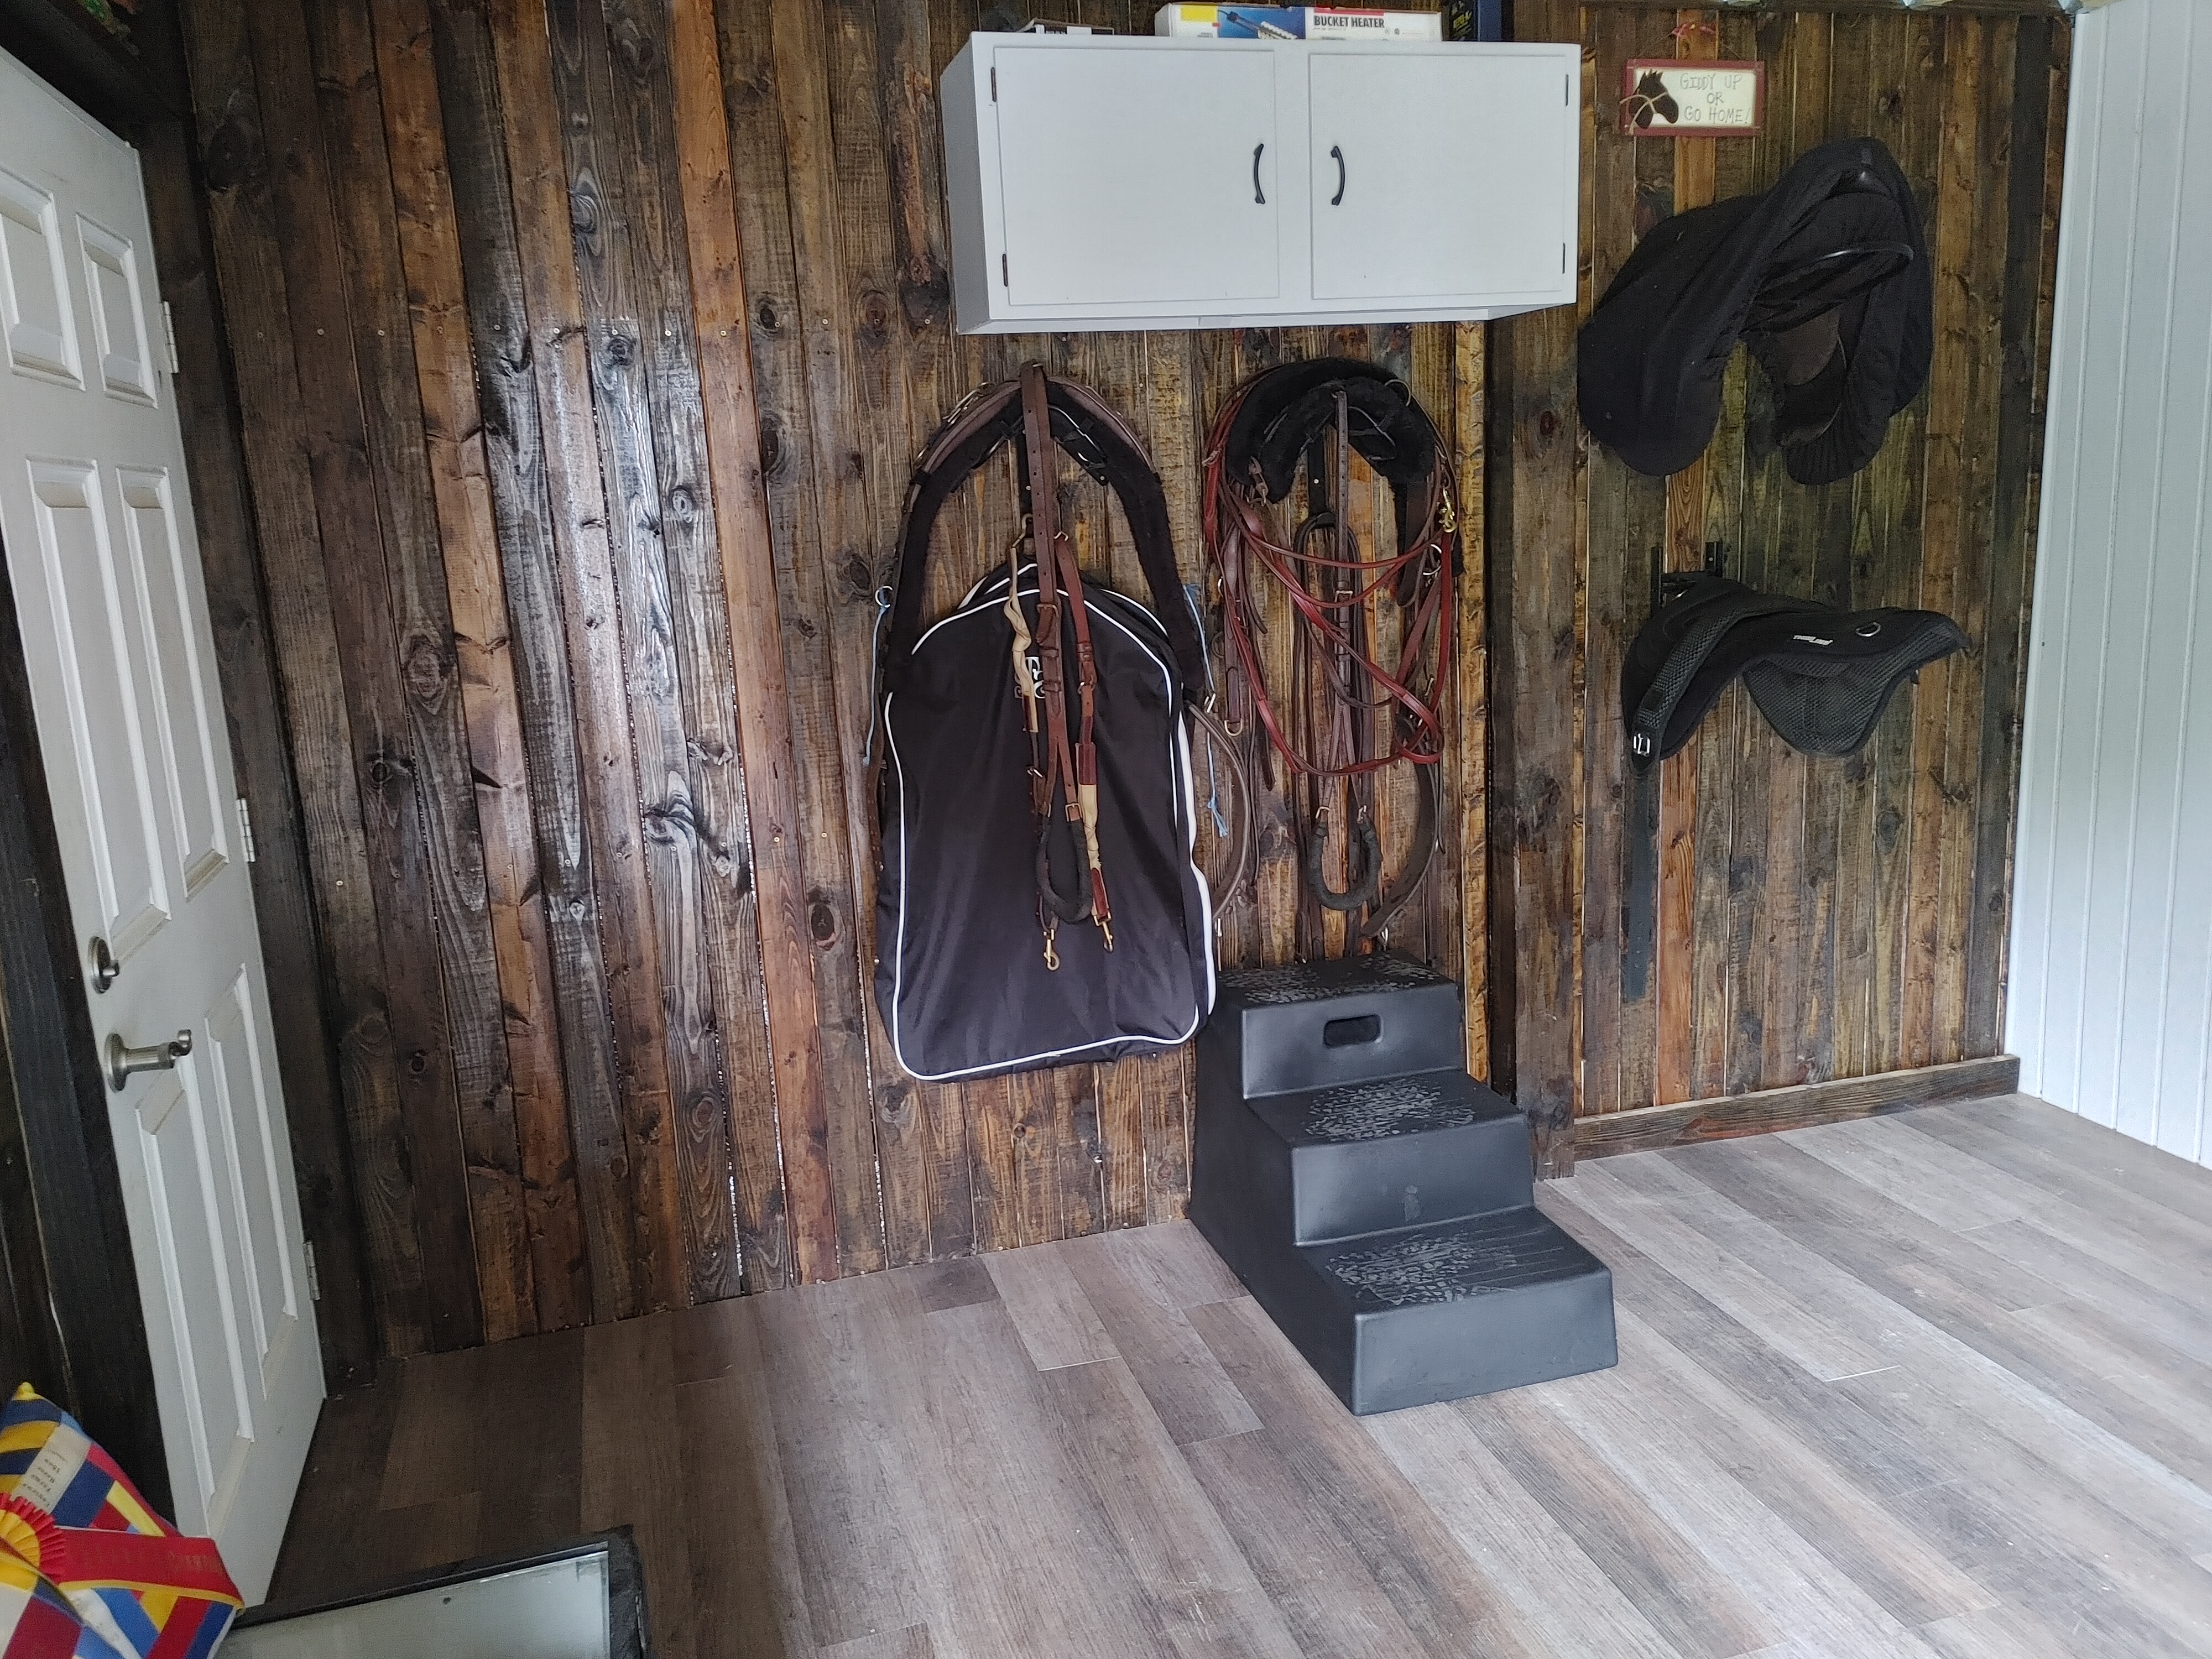
You can never have enough hooks to hang things on in a barn. Or enough bins to organize things. And somehow, with all the organizing tools in the world, you’ll still manage to leave things out of place. It’s OK. You have bigger problems.
Never underestimate a good pair of gloves. Or a good 10 pairs, because you’ll use the snot out of them and even the nicest pairs will eventually fall apart under barn use. Hay string spares no glove. Nothing else does, either. And for the love of God, don’t waste your money on cheap work gloves. Your hands will thank you.
I am sure I could think of a million other things. But for now, it’s time to go back to enjoying watching my horses exist. As much of a pain as they are, they make my days every single day. Sometimes they make them frustrating, but they always make them happy because I am one lucky lady to get to experience life with them right here with me.
It’s been over a year since I’ve had the boys at home, and in the past year I have learned things I never thought were even a thing. I never thought about these things because someone else was always managing my horses. I thought it was simple: Give your horses hay. Give your horses grain a few times a day. The end. I was SO wrong.
Did you know, certain (many) feeds contain ingredients that can cause an inflammatory responses in some horses? Feed quality affects body condition, hoof quality, and energy levels? Hay type and quality affects what types of feeds/supplements are needed to “balance” a horses diet for best body/hoof condition? Calories matter, weights of hay flakes matter, the amount of those hay flakes that are actually consumed matters. The amount of work they are doing daily matters. If you are feeding a supplement that you think is helping (hoof supplements come to mind) but your horses feed and hay combined already have the amount of those ingredients the horses body can absorb, you are literally throwing money at a problem and that money is being turned directly into manure. What a waste, right? Who knew? Well, apparently a lot of people, but I wasn’t really one of them until recently.
I have 2 horses with “less than ideal” hoof quality, as I have previously posted about. I have one that is a consistent tail rubber-and I have tried SO many things to get at this over the years EXCEPT changing the way they are fed. Up until last year, I really didn’t have much of a say in how they were fed as they were being boarded at other locations. As a means to an end with some recent issues, the investigation and research began as to how I can make an attempt at really fixing these issues. The resounding internet research, however reliable or unreliable it may be, was DIET MATTERS-and a proper diet can help with many issues. Now that they are here in my back yard, I DO have a say and I CAN try new things. So, here we go.
Lets think about how horses are designed. Their bodies are designed to “graze” most of the day (16-20 hours) and sleep very little. As such, horses are not meant to go long periods of time without food. Most of my research says 3 hours is the maximum you should let your horses go without ingesting some form of food, since the amount of stomach acid they produce constantly (for the grazing lifestyle their bodies are designed for) can cause a multitude of issues (ulcers, hindgut acidosis, behavioral problems, etc), many of which we battle with horses living a domesticated, performance lifestyle. This means they are stalled, and fed a few meals a day with a few flakes of hay at those meal times. This means they do go long(er) periods of time without food, depending on how fast they eat.
The average horse needs to eat 1.5 to 2.5 % of it’s body weight a day to maintain it’s weight. Say a 1000 lb horse is fed a grain meal at 7am and given 2 flakes of hay. Then dinner at 5pm, same feeding-a grain meal and a few flakes of hay. This is a typical feeding for many large barns. Assume 6 lbs of grain daily which is mostly the recommended amount to get the full nutrient content required, and each flake of hay weighs somewhere around 5 lbs, totaling 20 lbs per day. Assume your horse is going to waste some (if my horses are fed hay free choice on the ground of their stalls, they eat about half of it and use the other half as a toilet or extra bedding). So, that leaves 10 lbs a day of hay and 6 lbs in feed, and long periods of time in between feedings means if your horse does not “ration” it’s hay then it is without food for much longer than the max amount of time it should be. Not ideal, right?
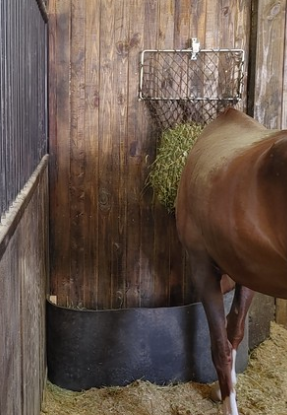
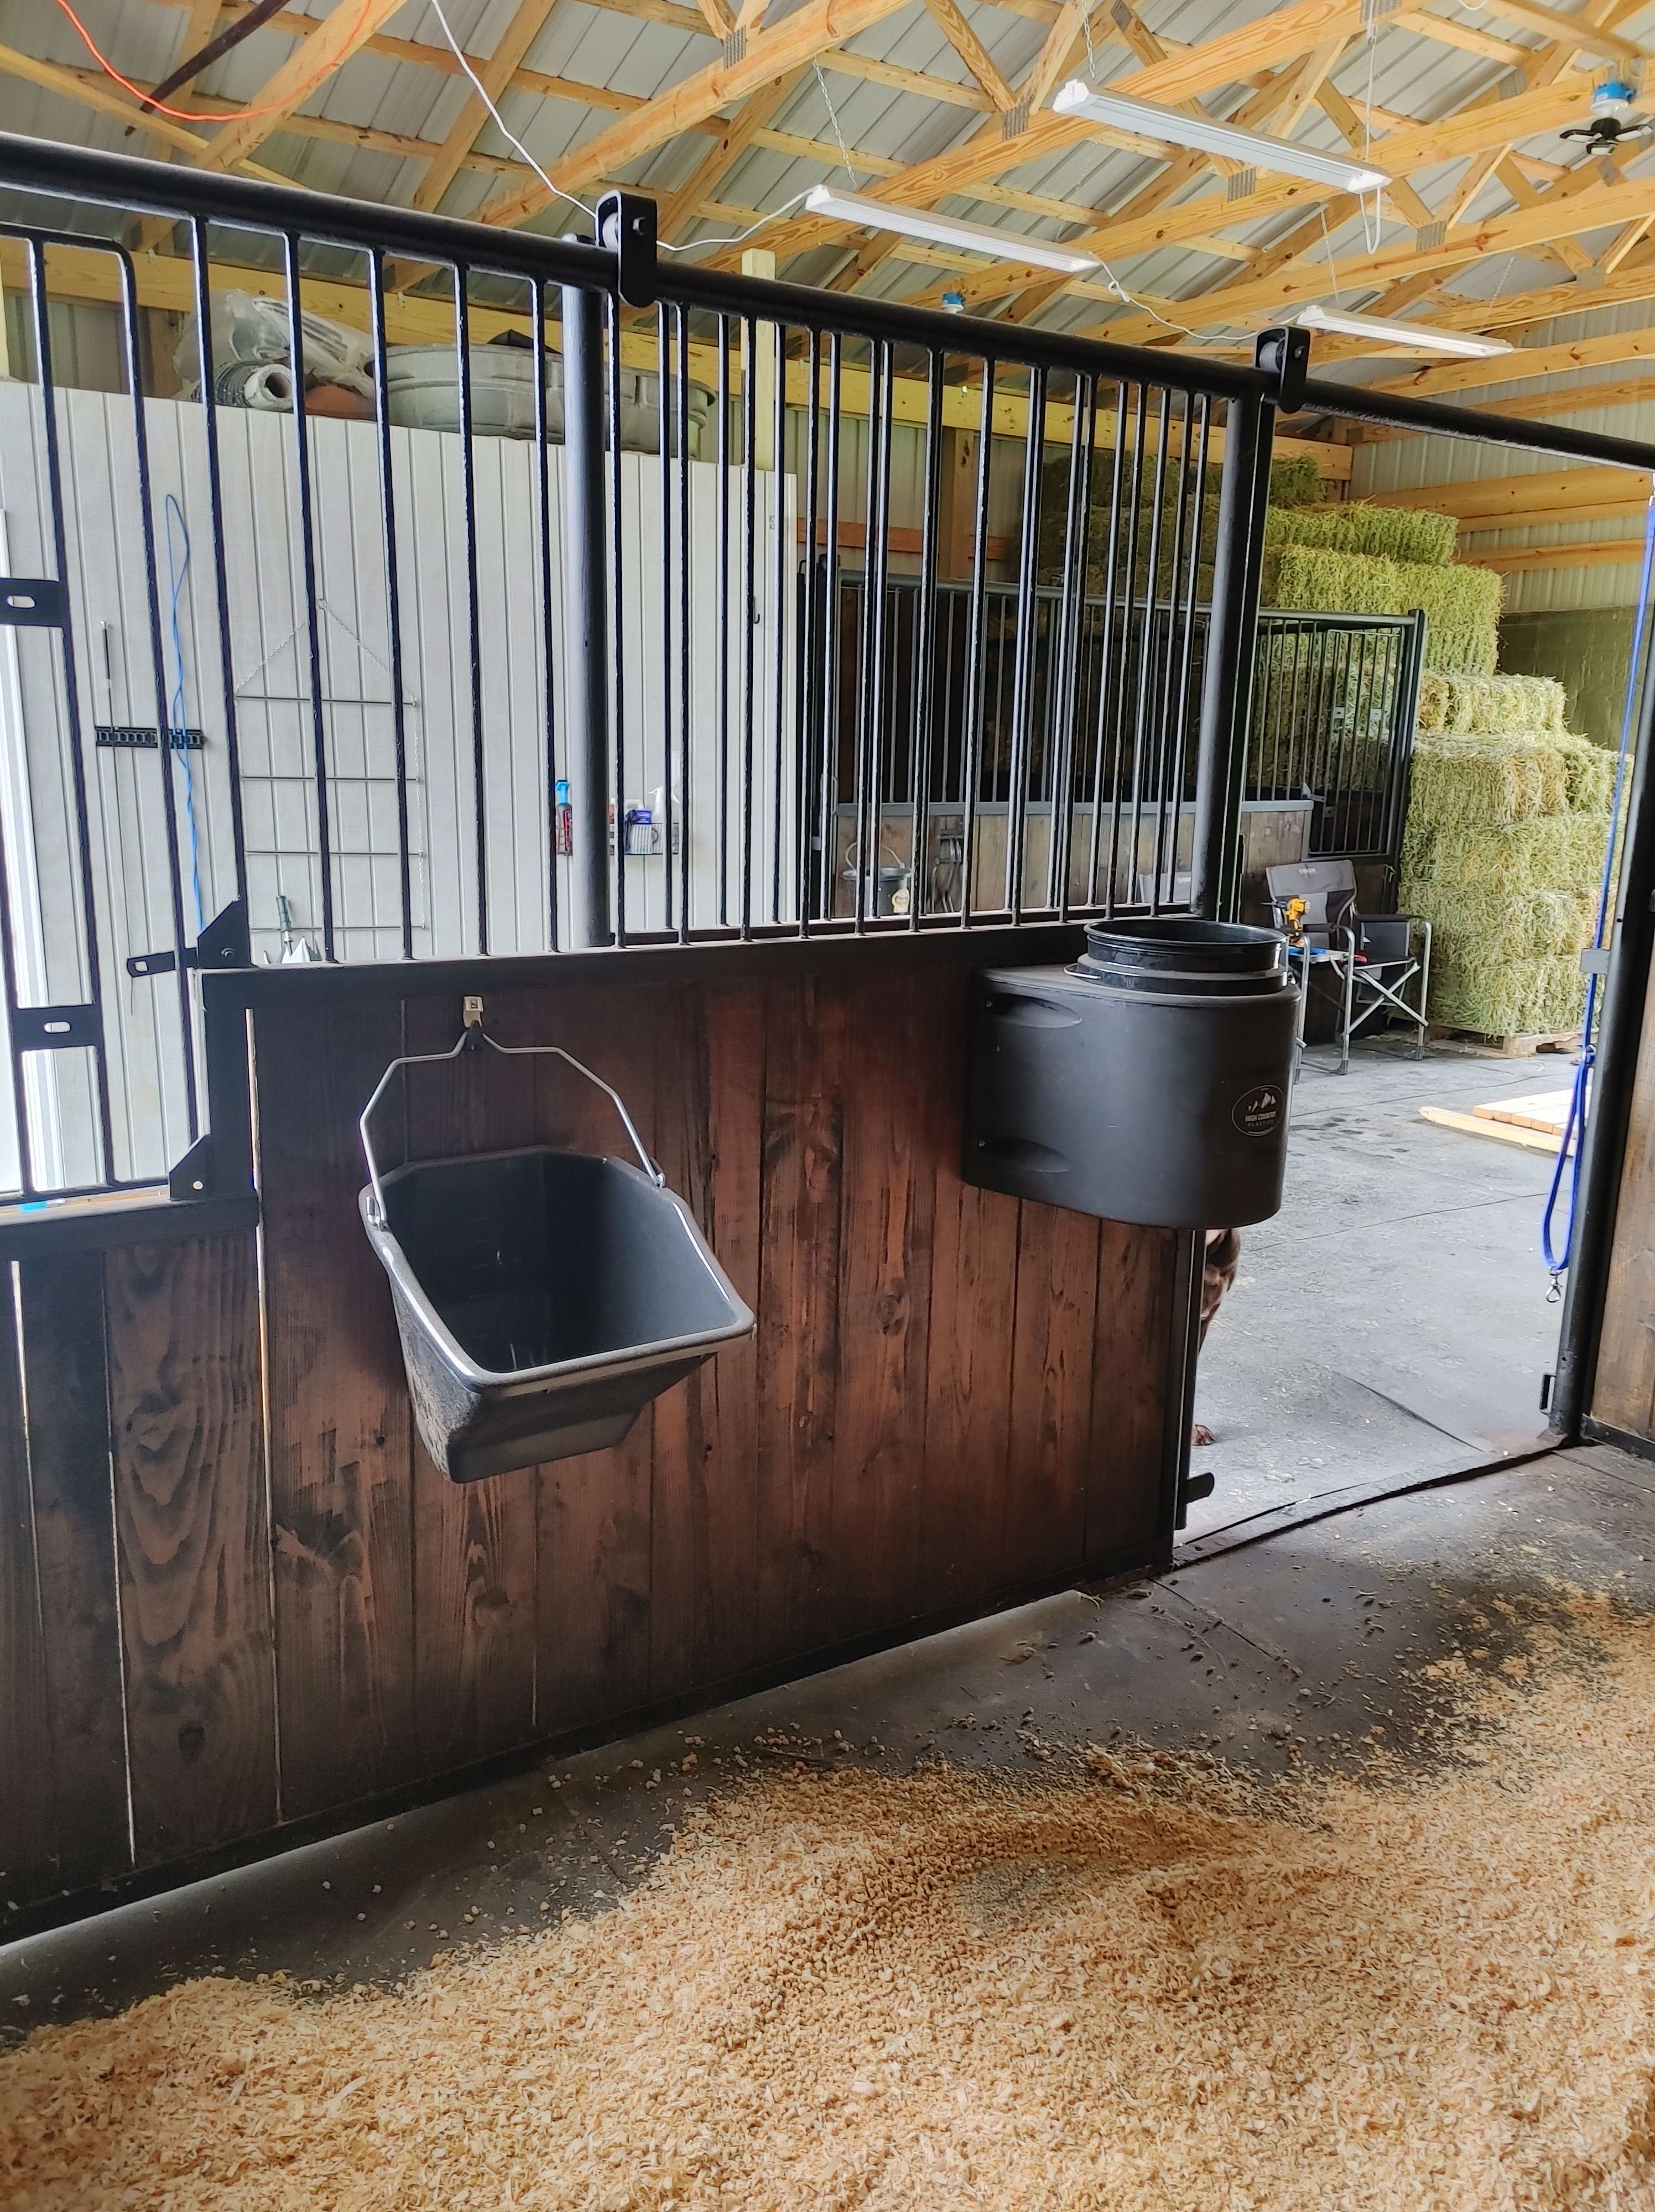
My feed setup is such that they get “free choice” hay in a contained area made with a piece of stall mat and also hay in a slow feed net (pictured below). If I fill both, it lasts them about 24 hours. One of mine leaves very little waste, and the other eats about 50%. I give his remaining 50% to the hoover/hippo, and refill both, about once a day or as needed. When they came here, I began feeding a high quality fortified complete sweet feed at 6 lbs a day split into 2 feedings morning and evening with 24/7 access to hay plus supplements for hoof quality and gut health once daily. The hoover got so fat over winter that when it came time for them to ease back into work in early spring, I didn’t have a girth that fit him! His grain got backed off to about 3 lbs a day. With that though, I began thinking about how he wasn’t getting the nutrients he should be, considering the recommended feeding for the complete feed was 6 lbs to get the complete nutrient amount for a day to make it “complete”. His weight improved with less grain, but his hoof quality has suffered over the last several months. Is it attributed to the reduction in feed? Who knows. Oh well… live and learn. Try, try again. Keep going. It’s all we can do.
About a month ago I decided I was going to switch to a forage based diet instead of feeding grain (fortified sweet feed) which is known for the inflammatory responses I mentioned earlier (maybe this is causing the tail rubbing? Maybe not but it won’t HURT it to try it and if it helps, bonus!). Now, they are completely off of the old fortified grain and easing into 1 meal a day of the following: 1 lb of a ration balancer mixed with soaked alfalfa cubes. Currently they are still getting their old hoof and gut supplements until those run out, then they will be switched to the new supplements I have decided on-one for gut health and one for bone and joint support (which is supposed to help hooves and also joints-if it works like it says). They will get an evening ration of soaked alfalfa cubes only, with added electrolytes to encourage more water intake when needed. My picky eater who wastes half his hay gets rice bran oil added to his morning and evening feeds for maintaining weight. The hippo skips this part. Both of them are transitioning well, but I have a feeling it’s the soaked alfalfa cubes encouraging them!
The up side to this is, IF either horse had inflammatory responses to the fortified sweet feed, that should go away with the new feeding program. The new feeding program will also be less sugary, so any issues that could develop where a horses sugar and starch intake would need to be monitored, would already be lower than the previous feeding routine and not much would need to change. Metabolic issues in horses can develop at any time, but even if they have not been diagnosed with these types of issues it seems there are still a lot of benefits to feeding a low sugar, lower starch diet to horses.
To be totally transparent, I have not had my hay tested so I do not completely know if they are getting a 100% balanced diet. However, I do know the average contents of the type of hay I am feeding and the contents of the ration balancer and it’s close enough. Will I potentially need to adjust the amounts? Yes. Will I maybe need to add other things? Yes. Will it maybe work out to be perfect as-is? Maybe. Will it change as the seasons turn? Also yes. Managing horses is an ever-evolving situation and something working today may not always work until the end of time. You have to be open to change. You have to be willing to research. You have to try your best. At the end of the day, most people managing horses are doing the best they can with their unique situations. None of it is the end all, be all, best possible way for every individual equine. I’m just over here trying to do what I feel is right for mine.
Since this is the first week switched 100% to NO fortified sweet feed, I have taken measurements of their girth to estimate a weight, and will do so weekly for the foreseeable future so I can keep a closer eye on how they are maintaining weight. I want to be quick to catch any drops so I can make any needed adjustments quickly. It’s harder to put weight on a horse than it is to take it off.
Later, I may add reviews on the new feed products and supplements after I have had a chance to see results on those. I am cautiously optimistic at this point and just praying I am making the right decisions. If not, I can always change it… again. Now, if I could only put so much effort into feeding myself! Yeah, not going to happen, but it’s a nice thought.
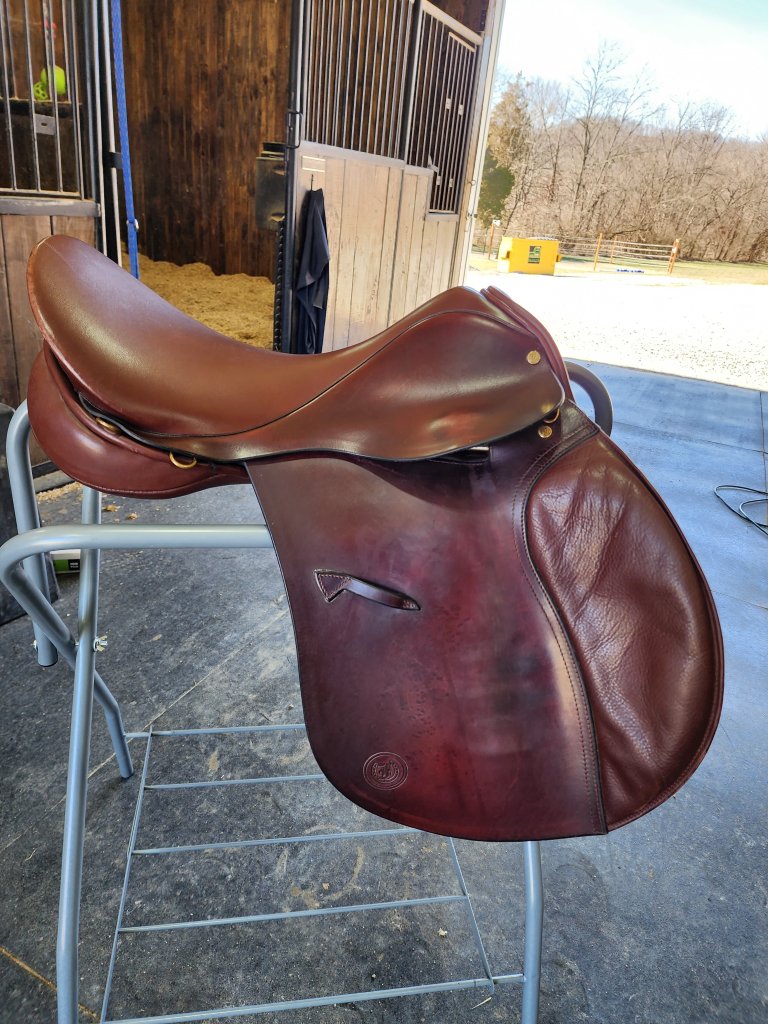
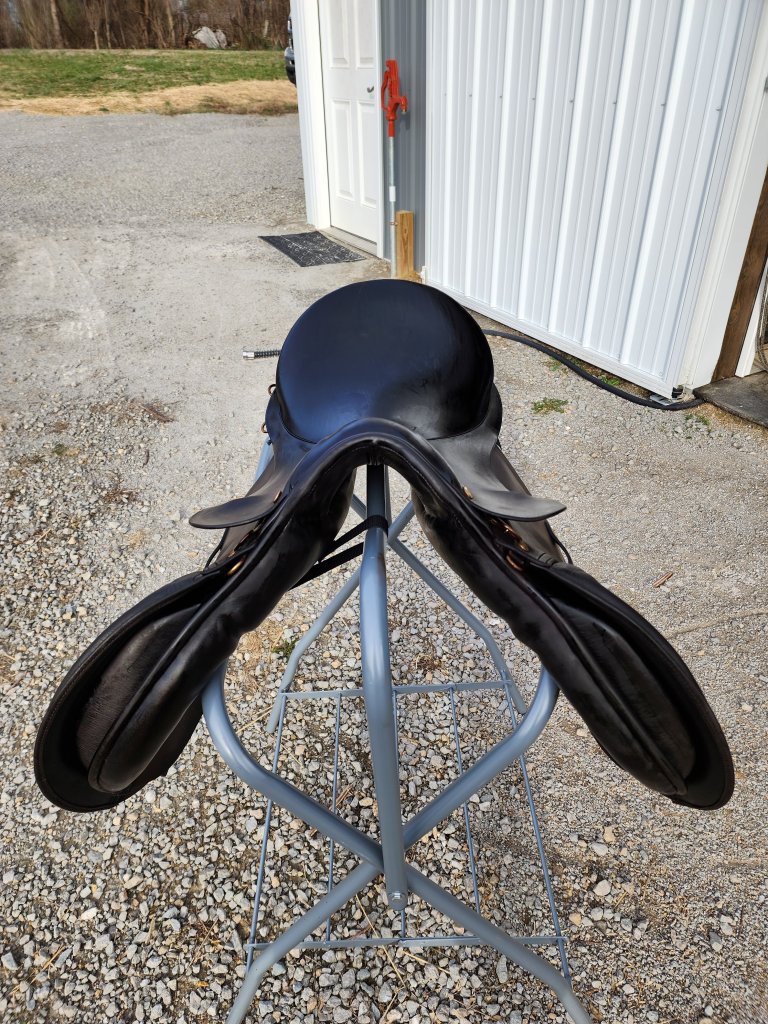
Trying to find a hunt saddle to fit Fizz, in a price range that I could afford, has proven to be a challenge. I have dealt with the ill fitting one for far too long and finally sold it a few months ago. I have since tried several others, to no true avail, and even sent info to a consignment saddle fitter and they had nothing they thought would work for him in their inventory of over 100 used saddles. I was resigned to the fact that I’d hit show season without a saddle and be stuck not showing. I did a demo a few weeks ago on a brand new Freedman, which fit him beautifully, but I cannot afford to spend nearly 4k on a saddle and fittings after it’s all said and done so I guess I’ll need to start saving my pennies and/or selling some things. (Who am I kidding, I’m a hoarder, I don’t really like to sell things…)
BUT, I am one lucky son of a gun, I picked up what I now know is a 2002 model Freedman hunt style saddle the same weekend. This came from the famed Walnut Way dispersal sale, how lucky am I? The only thing that is really wrong with it is that the knee roll foam is basically disintegrated. But, for $200, I could not say no to a saddle that had good potential to fit him. And guess what? It fits pretty decent, not perfect but better than the one I sold. For being over 20 years old, it’s in surprisingly great shape overall.
Since I am not in love with the reddish color of the leather, it does not match his Freedman show bridle or breast plate, and I have decided that I cannot afford the new one that I am in love with at this time, I have to make this one work for now. SO, I set out to find a solution to the color problem and I might be crazy, but I’m going to DIY dye this saddle. Yes, I could pay someone. But then I’d have less money to save for a new saddle while still having to use this one.
Products I used:
Fiebings Deglazer (this is probably acetone based on online research, but better safe than sorry)
Fiebings Pro Leather Dye: Chocolate color
Wool Dobbers (some online sources have said the “applicator” doesn’t come with the dye so I just ordered some myself to be safe) Low and behold, no applicator came with the dye.
Passier Lederbalsam- I have read that this is a great alternative to use for a top coat (like resolene) since it is heavy in beeswax, but still allows you to condition the leather (unlike resolene).
Here is what we are starting with, color wise. I prefer darker brown leathers and this orange/red is just not my style. Also note the wear marks on the flaps where it’s faded/discolored.
Before starting the process
Step 1: find a well ventilated area to work and gather your supplies. Believe me you don’t want your house smelling like this stuff. I used my barn, with the horses outside for the day. It was a breezy day so I didn’t really notice the smell until I left the saddle in the tack room to dry overnight.
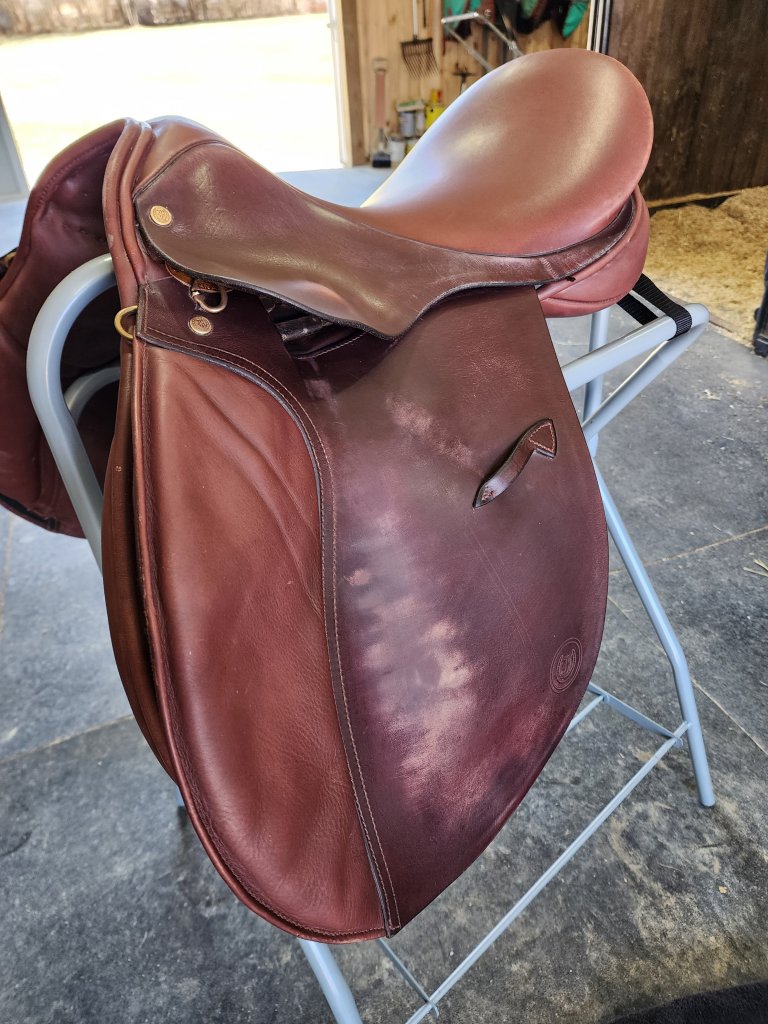
Step 2: Deglazing. This is to remove any top coat and oils so that the dye is able to penetrate the leather. It is scary. No one likes dull, spotty, dried out leather! But, it’s necessary so try to keep from cringing and keep going. Put your deglazer on a rag or piece of cotton and rub in circles everywhere you plan to dye. For me, it was everywhere with leather that I could get to, top and bottom. After deglazing, notice how everything looks extremely dull and discolored. Not that it wasn’t discolored before, but now it’s worse.
After Deglazing
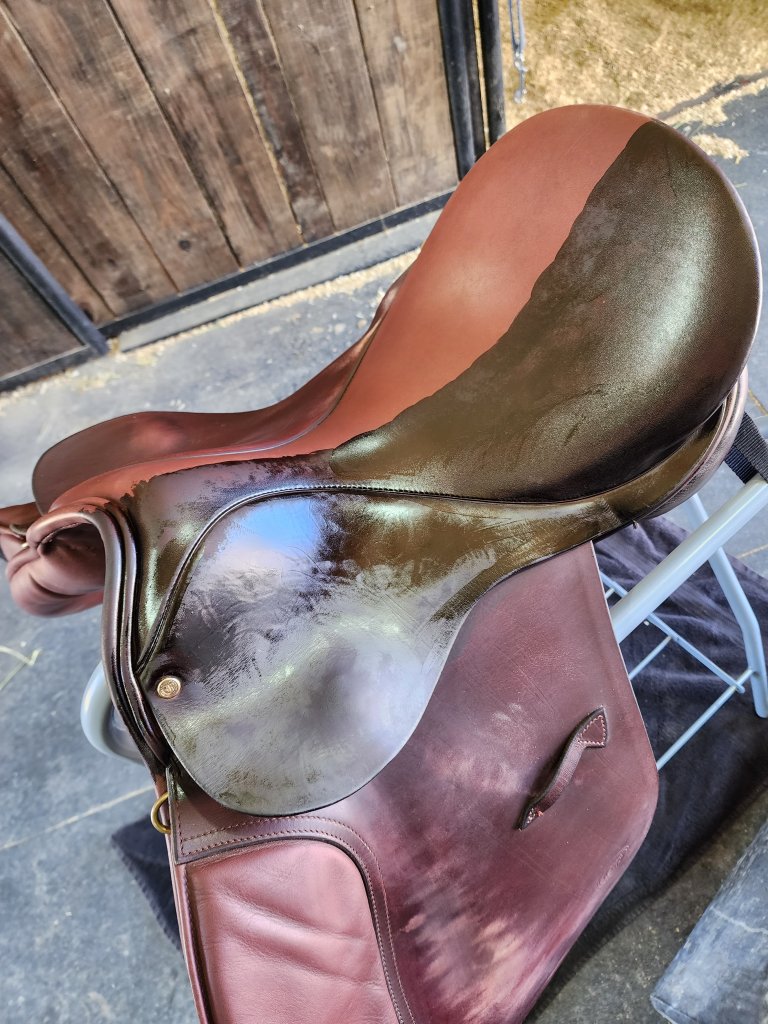
Step 2: Dye and buff!! Here is where you start to see the transformation, but again, it’s scary too!! Due to the dullness/dryness of the leather, the dye coat will look uneven. Do not fear. Just stick the coarse. Use the dobber and apply a thin coat. Don’t worry if it isn’t perfect, you’ll be doing more coats. After coat 1, I let it dry for about an hour, then went over it buffing with a rag to remove excess dye. Use the same circular motion like with the deglazer, and use a fresh rag. Microfiber works well and won’t scratch the leather.
In process, coat 1! Coat 1 of dye complete, before buffing
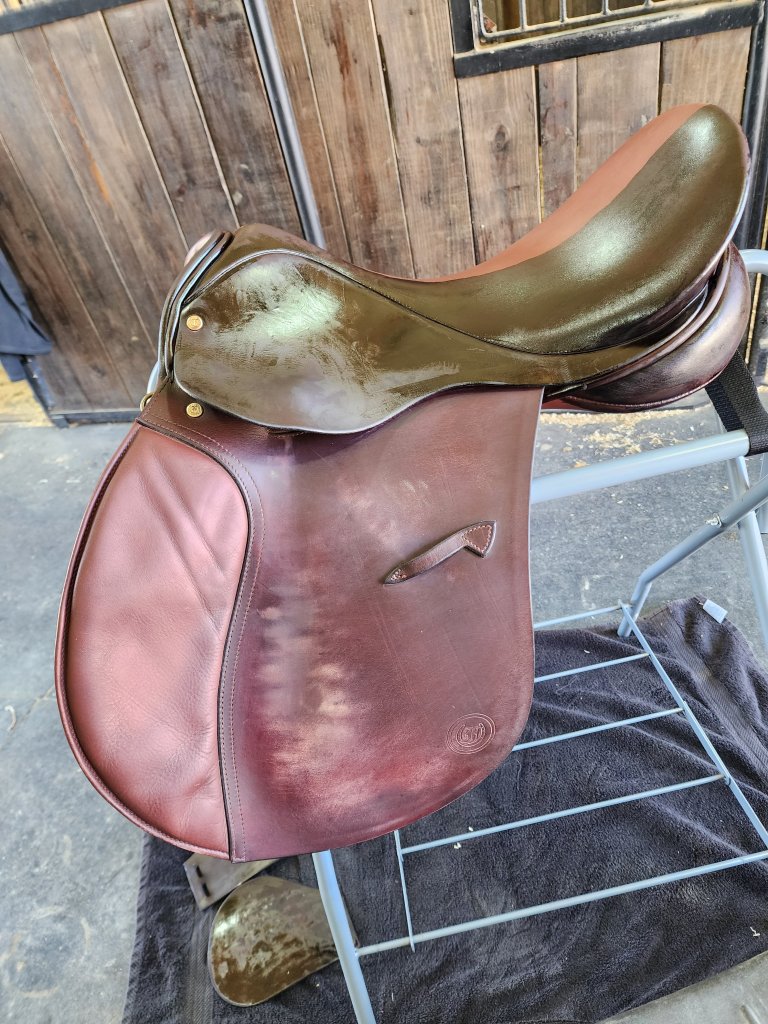
Steps 3 (and 4?) Repeat step 2 until you get the desired color and coverage with your dye (or until you run out like I did). I was able to do 3 thin coats on top, and 2 thin coats underneath with 1 dye bottle.
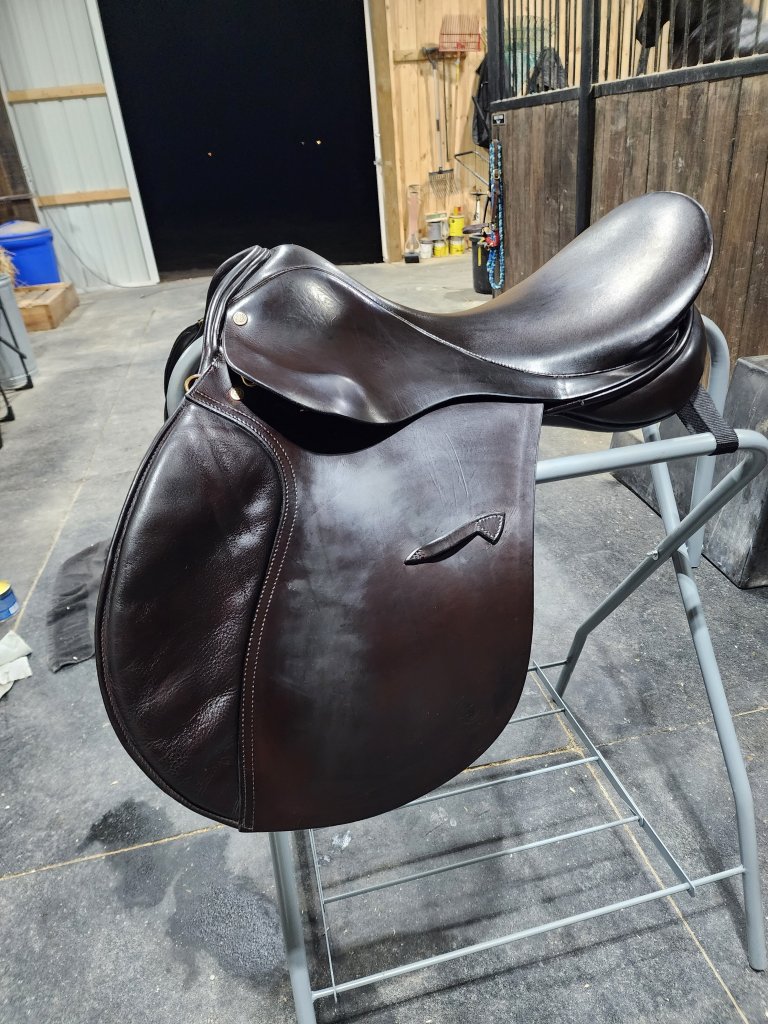
After coat 3!
After coat 3 I left it outside in the sun for the rest of the daylight I had left for the dye to soak in and dry. Then once it got dark I moved it inside the tack room to lock up, and left it there overnight (and most of the next day because, real adult jobs get in the way of fun horsey things).
Step 5: BUFF until you think your arms might fall off. OR until you come up with a better way to buff.
Step 6: Apply the lederbalsam. Slather that stuff on there like its going out of style and leave it to soak. Then again, buff buff buff.
Step 7: Repeat step 6.
Step 8: Repeat step 6 again!! Yes. At this point you may not have working arms. Haha but rest assured the end result will be worth the personal torture. I ran out of weekend and had to do this over the course of the next few weeks. Any time I’d get a few spare minutes, I’d just buff on the saddle some. I really think leaving it alone though let the dye set in really well, so points for procrastination.
Here is the finished product!!! I am pretty happy with how it turned out. I am not sure how it will hold up over time, but for now, I am pretty darn satisfied. The last photo shows how the color matches his new Freedman bridle and breast plate. Pretty perfect!! 😍
I’m not sure if I have mentioned this before but ever since day 1, Fizz has been a “tail rubber”. It is literally the WORST. He will rub his behind on just about anything he can find if left alone and naked with something to rub against. He’s 15 this year and I’m pretty sure after 10 years of doing this (probably longer), he isn’t going to stop now.
He’s been in just about every living situation one could think of since we got him in 2013: Full turnout, part turnout, full time stalled, in full professional training, part time training, etc. He’s been fed a variety of different feeds, been evaluated by several different veterinarians, all the things have been cleaned, he’s had just about every potion known to man slathered all over his tail. It’s been put up, it’s been let down, it’s been conditioned to kingdom come and back again. NOTHING stops the rubbing. I feel like it’s just a habit of his that started for one reason or another and now he just likes the way it feels to scratch his behind.
People suggest:
De-Worming (pinworms are common cause of tail rubbing)
Sheath/udder cleaning
Check for sweet itch
Check/Tests for Allergies
Condition Dry Skin
Consider a “no grain/anti-inflammatory” feed
Feed ground flax as a supplement
Apply Listerine/Baby Oil 50/50 mix
Use MTG (Sorry, I can’t get past the smell-I tried, really, I did)
Use coconut oil
While the above (or something else I haven’t heard of yet) may have worked for some, it did not work for us. It’s always been bad, but by November of this year I had enough. There wasn’t even enough left at the top for me to start a braid so that was just not going to work. I also suspect Duke was munching on his tail too, making it even worse. They have a wall with open bars in between their stalls, and I watched Fizz put his butt up to the bars and Duke bite at his tail one day! That was the last straw.
My solution: Just keep it covered, and keep it clean and conditioned as best I can. He lives in a turnout sheet or blanket with a tail flap (depending on the outside temp) since it’s winter and colder here right now so when he does rub, it just goes on the smooth lining and doesn’t mess with the actual tail since the surface is slick. He will live in a fly sheet/scrim sheet in his stall in the summer if he keeps up the rubbing!
Here is the process I follow, aside from keeping his sheet/blanket on him.
Wash 1x per month with an antibacterial/antifungal shampoo (you know, just incase-even if there isn’t the kind of funk you’d usually attack with this type of shampoo). I use EQyss Medicated shampoo that I got at Tractor Supply, our local farm store but you can find it on the internet also.
Condition ( I like Biomane’s conditioner-it smells so good! Or Cowboy Magic’s Rosewater conditioner)
THOROUGHLY dry. You do not want your tail to rot. It will rot if you put it up the least bit damp, then all your work and effort will have been for nothing. I use a blow dryer, but he careful to desensitize your horse to this and make sure they aren’t going to run off, kick you, break everything in the general vicinity, etc.
Do NOT rake through it with a brush. Hand pick out all the knots, use a wide tooth comb but be careful not to rip on the tail or you’ll be losing valuable tail hairs. Every little one matters especially when the tail is as sad as Fizz’s tail.
Braid/put up into a tail wrap or tail bag. I use a Sleazy Sleepwear 3 tube tail bag. He doesn’t have a long tail, so it’s sort of tricky but it still works well, even if it works better on Duke’s nice long thick tail. Lots of people use vet wrap and/or a sock but I don’t prefer this method. If you’re interested in that though, HERE is a great resource with some more tips on “show horse” tails.
Keep dock/tail bone conditioned/oiled. I use a variation of THIS concoction by the Savvy Horsewoman (who has a TON of really handy DIY recipes and ideas) and apply it 3-4 times a week. I just keep an eye on his tail bone and put more on if/when it starts looking crusty again. So far, it’s working pretty well and it smells great if you add the essential oils!
Repeat once monthly. Fair warning, this is not fun in the winter. You’ll have to use a bucket heater, if you don’t have hot water in your barn. You’ll have to try and wait for a “nice” winter day where temps are not freezing. If you go over or under on the month mark, don’t fret. Just take the tail down and inspect it, and re-wrap/re-braid regularly to make sure everything is still good.
This photo was taken somewhere around Summer 2022. Sorry for the crap quality, but you get the point. You can see all the super short hair up by the dock, and the rest of the disheveled hairs all down the top of the tail bone.
This one is from January 2023 (a few days ago) after using the above method. You can see the tail braid bag, down in the lower left corner of this photo. This is still not the “ideal” tail, but it’s MUCH better than it was.
I will have to keep revisiting this page when I have more updates to his tail “progress”. I don’t think we will ever have that long beautiful dream tail, but at least we can keep it from looking like a brillo pad.
What is with me and horses with “bad” feet? Not sure, but my first “reset” after getting the boys home did NOT go well for Duke. I had to get a new farrier, since the previous farrier does not come to my location. The new guy came highly recommended and he did not disappoint in the workmanship area. The boys feet looked absolutely amazing after he left and I was highly impressed. My bank account however, was not impressed. The previous farrier was much more budget friendly, and he always took excellent care of the boys despite their not so ideal feet. I’m hoping since now I can control every detail about their living and working environments, I can help keep their feet the best they can be. I can be extremely OCD and meticulous, and this situation is one of those things I have been very meticulous in managing.
The work Duke needed to keep his feet together required keeping leather pads with a shoe and applying epoxy to fix the parts of his hoof that were literally crumbling apart. He had soft, shelly feet and the bill I paid made me cringe. Shelly feet come from too much moisture, among other things (including genetics, vitamin/mineral deficiencies, etc) and I had a lot of instructions from the farrier to control and fix this moving forward.
No hose bathing
Sponge off sweat only, keep bell boots on to keep sweat scrapings off feet
Keep stalls clean/dry
No working on wet footing
No turnout when dew is present
Always work with bell boots on
Start feeding Farriers Formula Double Strength
I will probably do a review of Farriers Formula after he’s on it 6 months or so as it takes a while for the new hoof to grow out and see any benefits from a feed through supplement. I needed something to help FAST as I can’t sustain paying to glue my horses feet back together repeatedly over time. That’s where the Keratex comes in. I had used Keratex previously on Fizz when he lived in a field 24/7 and it seemed to help keep his shoes on longer, but I never really could use it in a controlled environment so I wasn’t sure if it was the Keratex or something else so although I had mentioned previously that we used it, I never did an actual review.
I wish I had gotten better photos, but I will share the photos I do have. Below are Duke’s front feet after being trimmed, where you can see the parts of them with chunks missing. This photo actually doesn’t do the damage justice. Those chunks were just flaking off with only finger pressure.
Below is a photo after the reset. The sections of white are the epoxy to create pieces of hoof to nail the shoe to. Such a pretty manicure!!
The day the above photos were taken, as soon as the farrier was finished, I went and bought a package of farriers formula and started him on it that day. I also started application of the Keratex the same day. Following the instructions on the package, I applied Keratex daily for 7 days. The packaging says to apply twice weekly after that as maintenance, but I went with 3x weekly due to the condition of his feet and how much we needed to improve by the next reset. Good idea/bad idea? I don’t know but in my mind an extra application wasn’t going to hurt anything.
Fast forward to 7 weeks later due to a farrier delay, and here is what the farrier had to say. Duke’s feet are HARD. He was able to do a reset into regular plates, with no pad for winter work! NO epoxy was needed! There is still a little bit leftover from the previous reset but by next trim it will be gone. He said they could actually use a little moisture, so he recommended to use Rainmaker 2-3x a week from this point forward.
Here is a photo of the reset after 7 weeks, just plain plates with no pad. The bill was much more acceptable! The Keratex did it’s job and then some. We have successfully managed to get hard feet in 7 weeks time with the use of this product plus the other management tips listed above from the farrier.
Verdict? If you have a horse with shelly feet that are crumbling apart, I would absolutely recommend Keratex. It appears to be the only product that chemically alters the horn of the hoof to provide results to what is essentially “dead” hoof horn. It also works on the sole, just follow the instructions on the package and stay away from the frog and the coronet band. I am not affiliated in any way with this product and I do not receive any commissions for recommending it. I am just a horse owner who has used this with fantastic results, and want to share so that it may help other horse owners with their horses if you find yourself in this situation. I hope you don’t, but if you do, give Keratex a try!
Since the horses got here a few months ago, we have been doing nothing but working in open space. Having never worked in totally open space before aside from trail riding, this was a new and different experience and I like some of the benefits of this, but also it has it’s disadvantages especially when you have a horse who you need to work on “slowing down” and open space to him means free for all to leave and you best just hang on for the ride.
For the past few months, we have been planning a round pen as a small controlled work area and also a small turnout since currently we do not have any of our pasture area fenced yet. Hand grazing several times a week has been very time consuming and not ideal. Since we are not white collar high class money oozing out our ears folk here, budget and cost is important and we needed a way to create an enclosure that would not break the bank but would contain my two (mostly) broke creatures and give us a safe space for them to have a bit of freedom.
I will explain how we built a round pen for under $400 in actual materials, not including tools which you can either buy or rent if you don’t have them. Considering corral panels are somewhere over $100 each and you need quite a few to make a round pen, and the lowest quote I got for someone to build a 4 board round pen was $2800, I think the $400-ish mark is a total win. Even with purchasing a hand held auger and a few other things to complete this task, we still came out WAY ahead of buying panels or paying a company to build something, and we have tools to help us work on future projects like a larger turnout space, which we will likely build the same way as we did this.
MATERIALS:
• 2 – 5 inch diameter, 8 Ft tall treated fence posts ($20 each from TSC) • 8 – Treated landscape timbers ($5 each from Menards) These are a decent diameter, and although they are not round like line posts for fencing, they were much less expensive and still treated, so that’s what we picked to use. You could probably use T-Posts if you are comfortable with those, but that’s just not what I wanted. • 6 – 60 lb bags of concrete ($4 each from Lowes) • 2 – Rolls of Zarebra Poly Rope (I actually used the balance of a roll of electrobraid I scored for $60 second hand, and used 1 roll of the zarebra for the balance that didn’t cover. I like the electrobraid better, but at over $200 a roll new, I wasn’t going to buy it just for this considering this pen will not be electrically charged. (The Zarebra rolls are $58 each from Menards). • 2 – Bags of Zarebra electric fence screw in insulators, 25 count. ($10 each from Menards) • 1 – Bag of Poly Rope Fence Connectors (I got them off Amazon, much less expensive than the name brand ones at the local farm store ($21 for a bag of 20, I only needed 10 for this-1 connector for each the beginning and the end of each strand) Make sure these are made for the size of rope you are using, as there are different diameters and the connectors will only fit a certain size rope. The ones I got are for 1/4″ rope, which is what we used. • 1 – 6 ft Gate ($139 from a local fence supply company) • Stain/Sealer (if desired) I used some leftover stuff I used on other projects around the house, it didn’t take a lot to do these posts. I would have chosen a different color had I bought something specific to this project, but this way I didn’t have to buy anything. You could choose to leave them natural. • Footing if you choose to add any. We did lime dust around the edges just so they wouldn’t be a muddy mess when it rains. The center is grass since we wanted the option to use this as a small turnout here and there while we get enough money saved to work on actual pastures.
TOOLS
• Manual Post Hole Digger • Tractor 3 point hitch auger or gas powered auger-we bought a gas powered hand held one, it was less expensive than the 3 point hitch one for a tractor. • Pinch bar (we got this one, and couldn’t have completed the project without it due to hitting rock) https://www.tractorsupply.com/tsc/product/groundwork-18-lb-pinch-bar?cm_vc=-10005 • Adjustable wrench • Drill • Screwdriver • Bucket (or wheelbarrow) to mix concrete in • shovel or rod to stir concrete • Stakes or spray paint to mark your post location • Tape measure • level
INSTRUCTIONS
Start by deciding the size you want to make your round pen. I chose a 60 ft diameter, as this is standard for working larger horses and gives a space large enough to ride in a balanced manor. It’s also a big enough space to let 2 horses loose in.
Mark the center of your circle and put a stake there.
Divide your desired diameter in half and measure that far from your center to mark where your first post will go. Since we chose 60 ft, I went 30 ft from center and marked my first gate post.
Measure out the rest of your posts and put a stake in each spot. I placed the 2 fence posts for the gate a little over 6 ft apart to accommodate the 6 ft gate. Admittedly the opening is a little wide, but it works fine for my guys anyway. The landscape timbers are each 20 ft apart. You could add more posts if you wanted to, but this distance is fine for the poly rope and worked for my pen.
Start digging your holes. If you have nothing but dirt, the gas powered auger will make quick work of this. I am 5’8 and not the skinniest or the strongest person in America, and even I could use the one we bought without much trouble on just dirt. My husband did most holes, but I did one and it wasn’t bad to use. If you hit rock though… the auger is essentially useless. That’s where the pinch rod comes in. That’s also where I was about useless. My husband had to slam this thing into the holes we were making hundreds of times over the 5 holes we hit rock on. Bless his heart for loving me enough to do this. I tried also, but just couldn’t put enough power behind it to do a lot of good. He would bust rock, and I would use the manual post hole digger to dig the hole out while he took breaks from rock busting. Here you can see an example of one of the rocky holes we dug with this time consuming, tiring, frustrating method. If you have a better way, by all means do that. As first time “fencers” this is the only way we could think of. We spent about 3 hours digging 5 holes manually, and about 20 minutes digging the other 5 where we didn’t hit rock with the gas powered auger.
Once all your holes are dug, you can start setting your posts. We concreted every post because with this being a circle each one was going to have at least some tension on it with the rope. Just mix up your concrete and add some to each hole. We filled the hole somewhere between 1/2 and 3/4 with concrete depending on hole depth. Some of the rocky holes were a little more shallow (18-ish inches) but the augered holes were around 2 ft deep or a little more. Make sure your post is straight using a level, and pack dirt in on top to secure it straight. This took both of us to do, I’m not sure 1 person could do this part successfully. We let ours set overnight before we did anything else.
Decide the height you want and measure for your insulators. I put the top strand at 5 ft high and did 5 strands because I felt like this would be most secure. So, 5 ft, 4ft, 3 ft, 2 ft, and 1 ft on the post was marked with a dot on all posts first. Then I drilled a pilot hole on each mark so putting the insulators on would be easier. I used a screwdriver through the “hole” in the insulator as a handle to rotate it until it was all the way screwed in instead of screwing it in with my hands. I hope this makes sense.
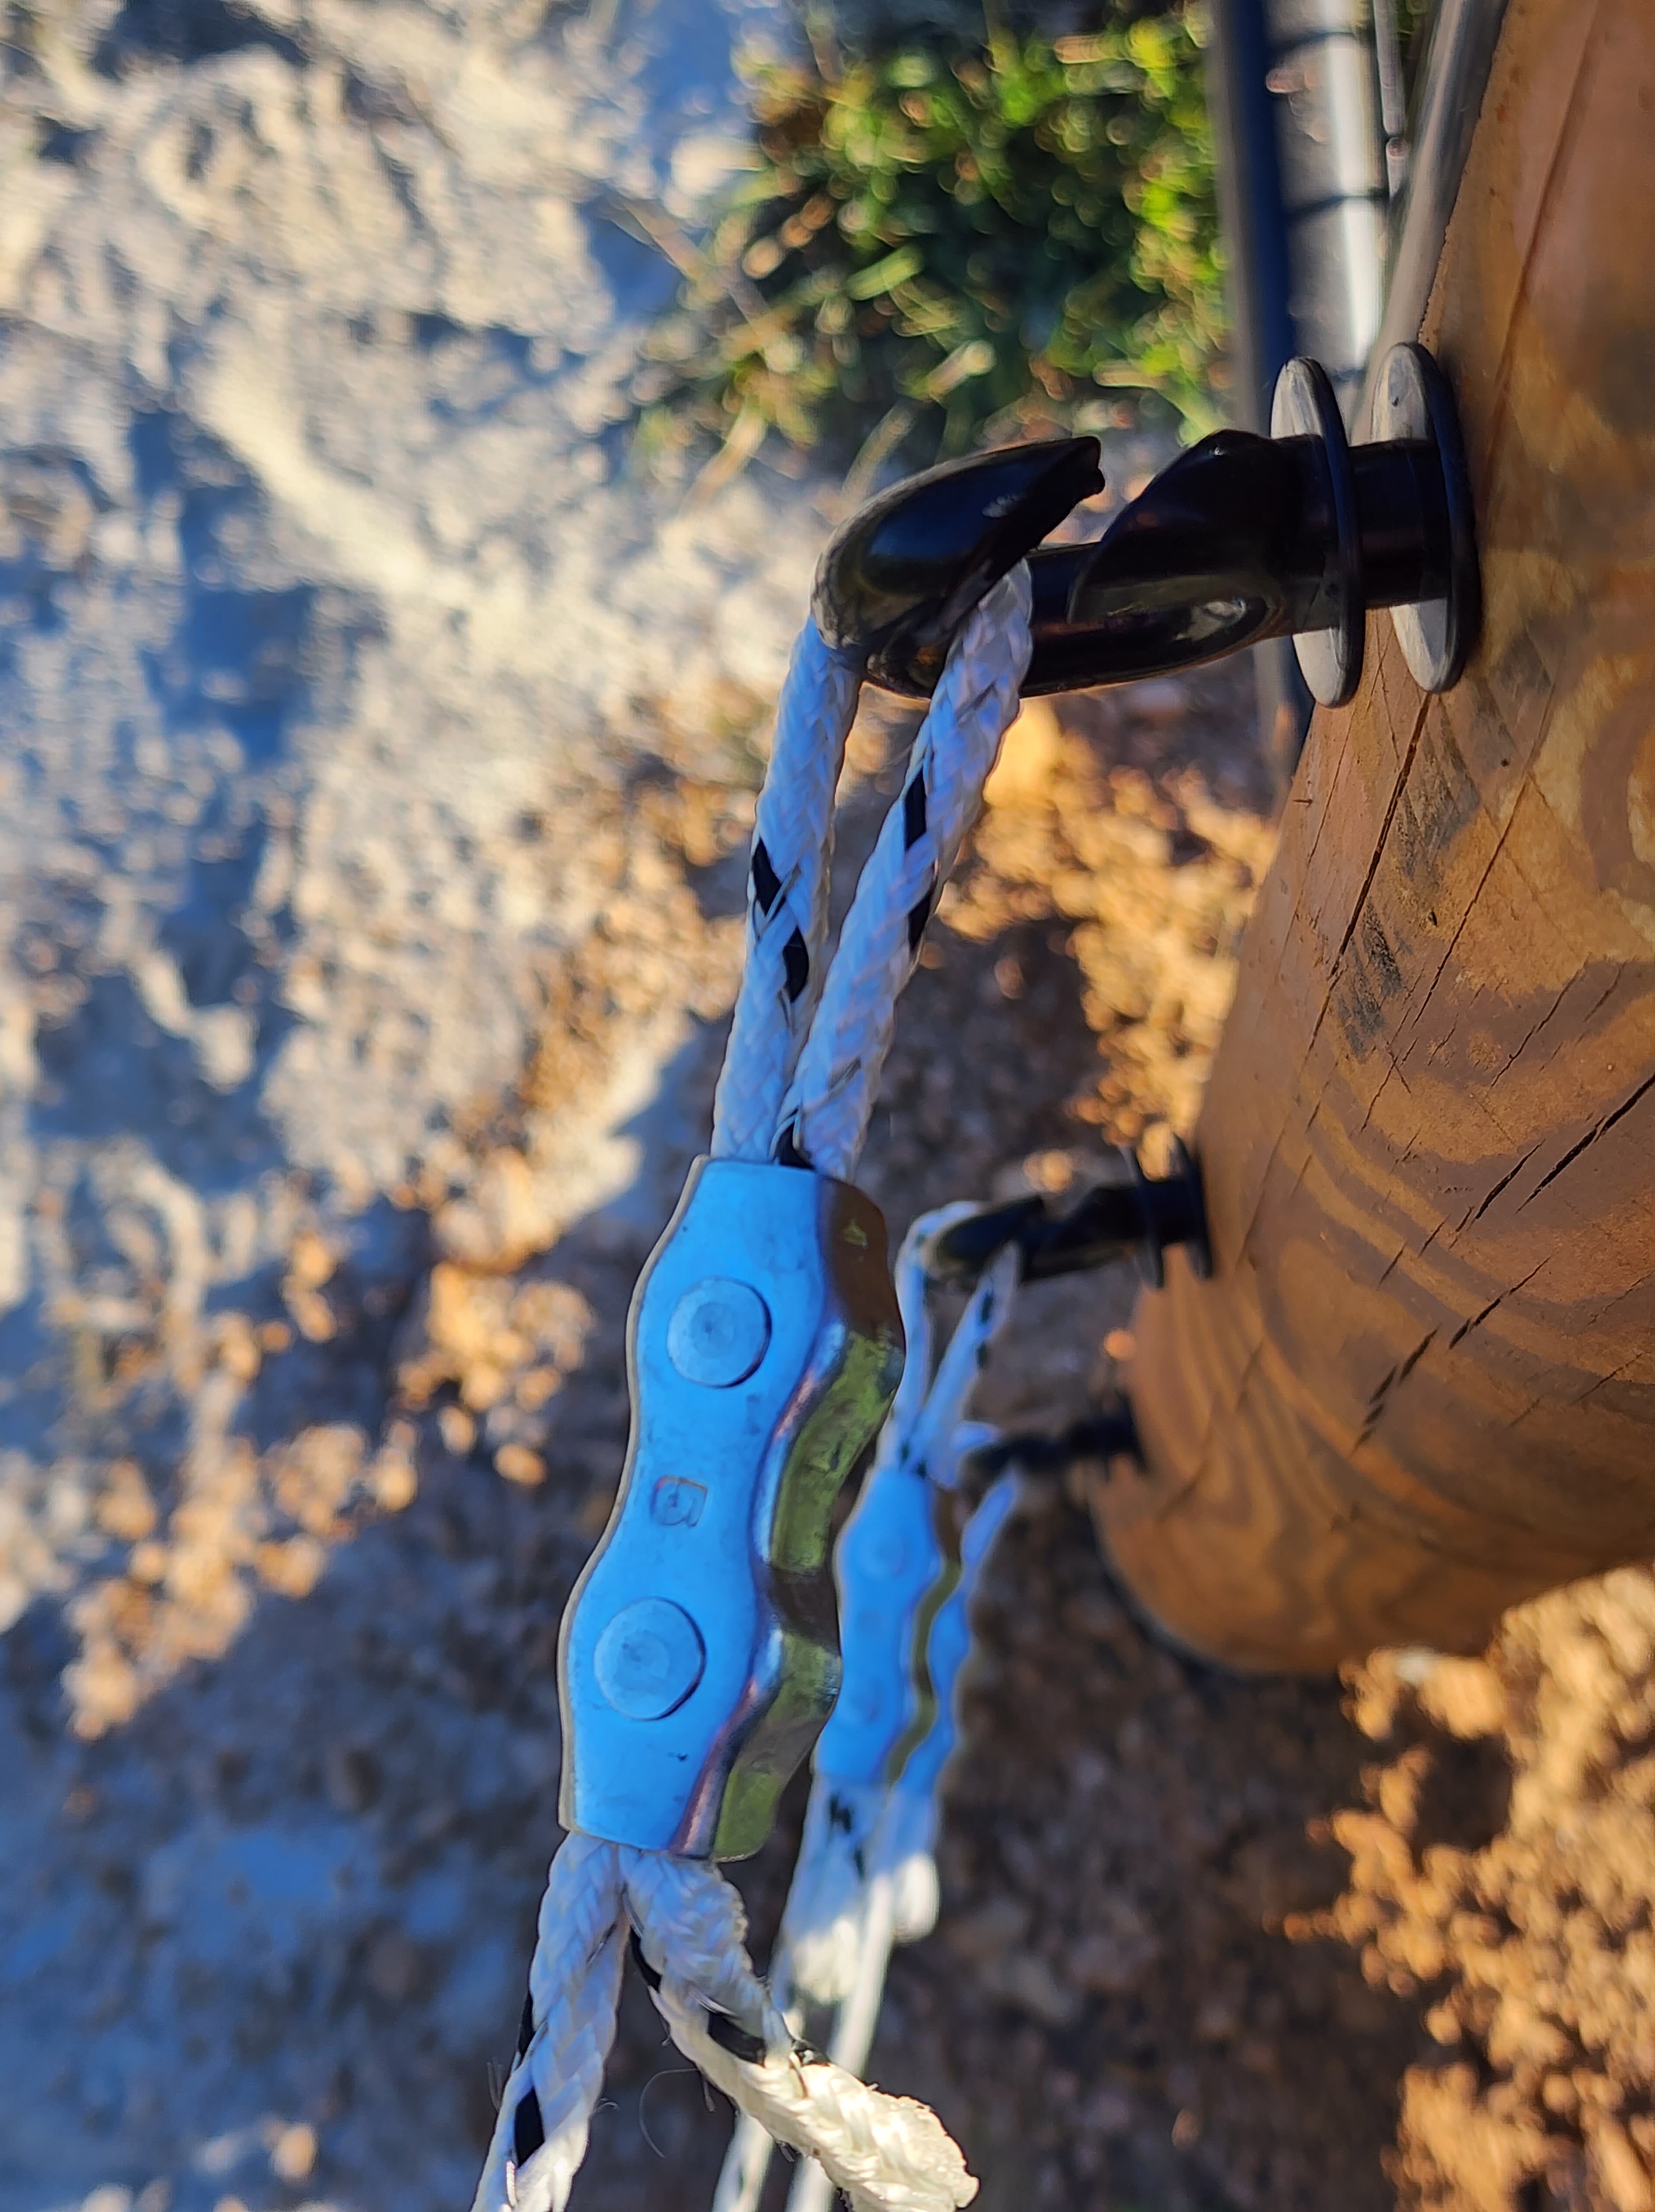
Once your insulators are on, it’s time to string up your strands of rope. Start by making a loop at one end through the connector and secure the connector in place. Photo below of how this looks. Put this onto your first insulator and then run your strand all the way around. Pull it tight and add another connector with a loop the same way through the last insulator. Make sure the entire way around is pulled tight, and adjust your end connector to take up the slack. Repeat for every strand you run.
The last step is hanging the gate. Pilot holes were drilled for the gate hinges, then used the adjustable wrench to rotate them until they were secure. The adjustable wrench was used to add the nut to the top hinge piece and tighten. We opted to tighten it until you have to push/pull on the gate to move it, but it could be left more loose if you prefer the gate swing freely.
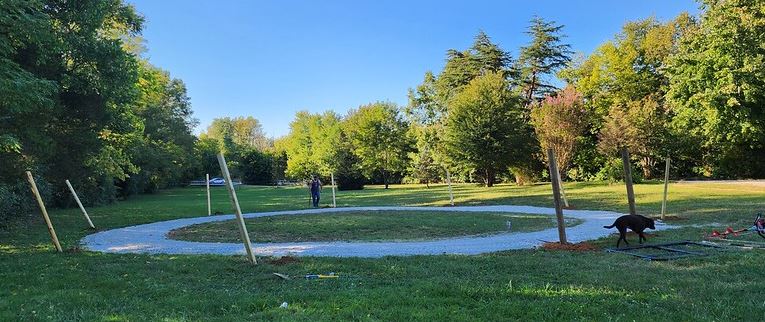
And DONE! Sit back and enjoy the fruits of your labor. Ride in it. Turn out in it. Do whatever you want!!
Disclaimer: We are not a professional fence builders, or even close. We have never constructed fencing, a round pen, or anything prior to doing this method of making a fence/pen. This is just what we could come up with on a budget and within our personal capabilities. Will it hold up over time? I don’t know. Will it keep in wild mustangs? Probably not. Will something very determined be able to bust out of it? It’s likely. Will it work for our purposes for our particular 2 horses? Absolutely. Keep in mind your animals level of training and respect for fencing/boundaries when you are building a round pen or any containment area for them and build something you feel will safely contain them. If this will work for you, terrific! Just know I am under no illusion that what we built will work for everyone. It will work for us so I wanted to share incase it could work for someone else who is also needing a very budget friendly option.
Check out the boys enjoying their first bit of freedom in this new space
LONG post alert, so if you’ve wound up here prepare yourselves. If you’re not willing to stay a bit, please pass on by to other content!! If you’re invested enough to read this whole thing, bless you!
I have dreamed of having horses at home since I was a little girl begging my parents to house a horse on their little 3/4 acre lot as a 6 year old. While that dream never came to fruition, here I am a 38 year old “little girl” a week away from my childhood dreams coming true. I have literally put blood, sweat, and tears (plus some, ok lots, of swear words) into this place for good measure. It’s been a process, and I have to say building outbuildings on this property has been one of the most trying “adventures” of my life. I have laughed, I have cried, I have cursed (a LOT). I have juggled obtaining permits, hiring contractors, contractors not showing up, having major delays, getting inspections, doing physical building, making hundred of phone calls, and trying to keep my husband from divorcing me over this whole process (I kid, I kid) but really… it’s been crazy to say the least. It has not been easy by any stretch of the imagination. But I do think it will be worth it.
So lets talk about the emotional overload that is going through my head right now as someone who has never had horses at home. This is a subject so many horse people experience and yet, few really talk about it. I realize that being the primary caretaker of horses is work. I realize that it’s a labor of love. I am no stranger to doing hard things, but if I am being real and honest, it is a little bit terrifying to know I currently rely on someone else, who provides food, water, stall cleaning, training, and everything in between to my 2 horses… and soon all of those responsibilities will fall on me. Soon, 2 living breathing, very large and complicated animals will rely solely on me for their every need and overall wellbeing. In theory (as a horse person for the vast majority of my life) it sounds easy, but I’ve never been one to pull the wool over my own eyes.
I will have to procure hay, grain, and bedding and make sure it’s constantly available. I will have to clean stalls. I will have to make sure they are fed and watered. I will have to schedule vet appointments, farrier care, and any other care needed. I will have to make sure broken things are fixed and that every environment the horses are in is the safest it can be. Ya’ll, do I sound crazy for thinking those will be the EASY things? I have to WORK these beasts, continue their education, make sure they are upstanding citizens of the equine world. Basically ALONE. I’d be lying if I didn’t feel a little overwhelmed thinking about that part.
Back when I was working Fizz as a new AOT, I LOVED every second of the planning but lets be honest. I had zero idea what I was actually doing as a “trainer” and I flew by the seat of my pants most days. Looking back, I thank God every day that I ended up with such a smart, intuitive, and TOLERANT animal. That said, I feel like I have grown and I have learned a lot since 2013, and myself and both boys are better off for it. I have gained friends in this industry who have a wealth of knowledge that I have been able to tap into. I have people I can turn to for help now that I didn’t have back in 2013. How lucky am I? How lucky are my horses?
So lets talk about fears as the complete vulnerability of a “new” horse parent exposing everything for the world to see is something I have not run across. I’m not sure if people just don’t talk about this publicly or if I am that crazy overthinker who can’t stop “What Iffing” things to death. I’ve been riding and showing for a long time and I have cared for other people’s horses in the past. My first year of college was spent taking care of a farm of Friesians and Andalusians. But they were not on my property and I did morning feeding and stalls, and afternoon riding. I was not their one and only sole caretaker. I am not exactly a “new” horse owner, but being “new” to caring for them 100% of the time still comes with some real fears.
Fears about training 2 horses as an AOT, and doing it basically alone:
What if they regress with an amateur “trainer”?
What if I fall off and they get loose?
What if I can’t get them hooked to the cart for exercise?
What if there is an accident?
What if I have problems I can’t figure out?
What if I can’t work them enough?
What if I don’t do the right things? Or do the right things, the wrong way?
What if I get hurt and can’t exercise them?
Fears about keeping horses:
What if they get injured?
What if I don’t notice if something is wrong?
What if I can’t get what they need (hay shortage, etc)
What if I can’t be here?
What about vacations?
What about emergencies?
What about holidays? (4th of July and massive fireworks being shot off for weeks on end comes to mind)
What if I can’t get them calm?
What if I can’t get a vet here for emergencies?
These are things I can only think of off the top of my head as things I’ve thought about previously and had concerns about. However, as an overthinker, a planner, and a “hope for the best, prepare for the worst” kind of person I have taken steps to prepare for most of these and ease my mind to the best extent that I can. Some things will just have to fall into place after the horses are here, we have a routine, and I see that my incompetence isn’t actually as bad as it is in my head a lot of the time. I mean honestly I don’t give myself enough credit. Not to toot my own horn, but I am stubborn. I am tough. I am resilient. I do not give up and I do not lay down and sulk in my own deficiencies. I get up and I research and I ask questions and I strive to do better every day. In my opinion, there is no other option when such smart, also resilient, and talented creatures are relying on me to not only survive, but to thrive. So, lets go through the list again, this time with some answers.
What if they regress with an amateur “trainer”?
Keep doing things you know work
Have resources and don’t be too proud to contact them
Be humble enough to own your mistakes and do better next time
Don’t beat yourself up. Most horses are resilient and forgiving.
What if I fall off and they get loose?
Put up barriers on the property to contain them as best possible
Duh, ride better, don’t fall off (ha!)
What if I can’t get them hooked to the cart for exercise?
Teach them to stand quietly until you ask them to move
Ground work is just as important as other work
What if there is an accident?
Accidents happen, have a plan in advance
First Aid kit (horse and human)
Vet #
What if I have problems I can’t figure out?
Again, don’t be too proud to ask for help or bounce ideas off someone else.
Have a network
What if I can’t work them enough?
You can only do what you can, and it will have to be enough
Set your priorities and make a clear, easy to follow schedule ahead of time
yes it requires thought, but it’s important so DO IT
What if I don’t do the right things? Or do the right things, the wrong way?
If something isn’t working, change it
Try new things. Everything great was once just an idea.
Ask someone to watch you, give you tips or correct you
LISTEN when someone corrects you
What if I get hurt and can’t exercise them?
Then you ask for help. Remember your circle and keep them close. Support them on their journey, and offer help when they need it and they will, (should) support you too.
Otherwise, have (for us: create) a turnout area and let them be horses!! They may not make training progress, but they’ll survive and be happy.
If turnout (at home) isn’t possible, arrange for alternative care off property.
What if they get injured?
Keep vet information handy
Read up and have a good base knowledge of basic care for wounds, etc
What if I don’t notice if something is wrong?
know you can’t be there 100% of the time
make sure you know warning signs for common problems
know your horses “good” vitals and keep what you can documented
Temperature (Average horse should be between 99-101F)
Heart Rate (Average should be 36-40 beats per minute)
Respirations (Average should be 8-15 breaths per minute)
Gut sounds (A mixture of grumbles, tinkling and roars. There is no rhythm but you should hear a sound every few seconds)
Capillary refill (should be 2 seconds or less)
Hydration (If you pinch your horse’s skin it should return to lying flat within 1-2 seconds. The longer the skin stays pinched up before flattening, the more dehydrated the horse is.)
What if I can’t get what they need (hay shortage, etc)
PLAN AHEAD
Have a standard supplier
Have a backup supplier
What if I can’t be here?
Have a backup plan and arrange alternative care as early as possible
What about vacations?
Plan early, book a house sitter or arrange to take your horses off site as soon as you set dates
What about emergencies?
Keep all emergency contacts in an easily accessible location
Veterinarian (all contact information including emergency numbers)
Farrier
Insurance Agency (If horse is insured) to include their 24 hour line
details about insurance coverage
What about holidays? (4th of July and massive fireworks being shot off for weeks on end comes to mind)
Discuss with Veterinarian and have a plan IN ADVANCE (medication, ear plugs, stall fans, music, whatever it is)
What if I can’t get them calm?
Don’t doubt your abilities to handle a crisis
But for real, also don’t live without some reinforcements.
Make sure you have something from the Vet (Ace, etc) or otherwise (calming cookies, calm n cool paste, etc) and you know how to administer it incase you need to.
What if I can’t get a vet here for emergencies?
Get annual exam done so you are on file with local veterinarian and eligible for emergency/after hour calls
There is always the option to trailer to an emergency clinic
Again, know basic care and make sure you have basic items on hand to use/administer if needed and know what is appropriate for most basic situations.
So there you have it, me in all my uncomfortable vulnerability. Ew. Anyway, I wonder if any more experienced horse keepers have anything to add here? Words of advice, encouragement, knowledge to share, etc. I’m sure there is a lot I am not covering or not thinking about and I’m sure so many other things will pop up over time. I haven’t really talked extensively about this among my small circle, but I am sure if there is anything I need they will have my back.
Overall, I am excited beyond words and I can’t wait to have my boys home with me. So, if you’ve made it through this entire post, congratulations for your exceptional patience, haha, and enjoy these photos! I will make a post eventually on the barn build and how much of an experience the whole process has been! Maybe after I’m happily caring for my horses and the frustration from building has gone to the wayside and I can recollect the process without so many swear words.
First and foremost, I was in no way, shape, or form paid by or affiliated with this company, nor did anyone give me any incentives to review these boots when I did my initial review (below) in 2016. I did my own research and decided on this purchase due to the good price of these in comparison to other brands, plus the reviews I read on the internet (which, let’s be honest, you can’t always trust). As an update, 2/6/2025, Cavallo is now offering customers incentives for referring others to their brand. Since I am still a user of and believer in their product, I signed up for my own link to the incentive program! As a benefit, if you purchase from my link, you get 20% off your purchase! Just click here: Referral Program Link
Short version:
Cavallo Simple Boot is well constructed, easy to apply, and immediately helped Fizzy walk across rocks like he still had shoes on 10 days after having them removed. They stayed on at a walk, trot, canter, and gallop, and did not twist or turn. I look forward to using them a while and maybe updating this review!
Long version:
Let’s backtrack for a minute and let me explain what led us to the decision of purchasing hoof boots to begin with. If you read our blog, you read about the shoe throwing incident on the day from hell a few weeks ago. If not, that story: Just Stay Home! Well, the farrier could not get out to reapply the shoe, and Fizzy managed to destroy that hoof in the two weeks it was off. We had planned on one more show this year, but did not want to put the shoe back on a shorter hoof, just to pull all 4 shoes less than a month later. We decided to go ahead and pull all 4 shoes, and let him go barefoot until spring. However, he is very uncomfortable walking on rocks, as we also shared, and seems not as comfortable even in the arena as he was with shoes on. It’s now 10 days after the shoe removal, and it’s obvious it will be a long process to get him comfortable being barefoot. To aid in this and allow us to keep working him lightly and maybe even go on a few more trail rides, we decided to try the boots because, well, we will do anything to make our horse happy and comfortable. That plus the cost of them is less than one shoeing for 4 hooves! Since our plan is to keep him barefoot until April, we’ve got 7 months ahead of us.
So, I ordered the Cavallo Simple Boot via Amazon Prime (sold by Cavallo Inc) in a size 2 Friday night after measuring using the tool they had provided on their website www.cavallo-inc.com. First of all, it was VERY easy to measure using this tool, and if you know even the slightest teeny tiny little bit about horses you can use this tool. The boots and also the pastern wraps (purchased separately) had come by Sunday. Oh the joys of amazon prime and 2 day shipping especially as a horse owner, but that’s another conversation.
Anyway, I was excited as a kid on Christmas morning opening up my (Fizzy’s) new boots! They even sent me a free hoofpick and another free gift (some digital info on barefoot trimming that is very informative). From here on out, I will probably refer to these boots as his “Nikes” because they are indeed comparable to a tennis shoe for horses. They came in a box very similar to a shoe box human shoes come in, too! Upon initial inspection, I can tell in their new state that the boots are well constructed, sturdy, and to me very interesting looking contraptions! They appear easy to apply, so I head on over to the barn to give them a go. I wish I had taken photos and video of him actually wearing them, but I was a little bit pressed for time and wanted to pay him the attention he needed while I was there. I promise I will provide more photos at a later date, and also intend on doing a follow up review after using them for a while.
Putting them on was not hard, once I figured it out. I’ll admit, I might be slightly slow with new things I’ve never seen before. I proceeded to put on the pastern wraps first. Of course I read the directions! (Those of you who don’t know me, understand this is the first thing I normally throw away). Yes, I will admit I tried to put them on upside down, then felt really dumb after I actually DID read the instructions. I felt dumb again after I put the first boot on the wrong hoof and didn’t realize it until I went to latch it. I share these mishaps with you all because it does us all good to be able to laugh at ourselves at times. Anyway, once I got them on the correct hooves and all latched up, I took Fizzy to the arena (across the rocky driveway at the barn) and could immediately tell a difference in his level of comfort vs. having nothing on his feet. Praise Jesus! Because watching him walk on rocks barefoot as it is right now makes me want to cry.
We did some free lunging at a walk, trot, canter, and Fizzy’s personal favorite, the uncontrolled gallop. They stayed on at all speeds! They stayed latched and didn’t twist or turn. So far, so good and I am impressed! I look forward to using them to work and hopefully trail ride him some this fall, and then I will update with another review of how they performed doing those things. So far, I love them for what we purchased them for and would recommend them to a friend. I feel like if Fizzy could speak, he’d recommend them to a friend too, because he seems to feel like a million bucks wearing them on rough ground vs not wearing them.