Saddleseat

A lesson in Bit Converters

When you’re an AOT, you should always, and I do mean ALWAYS be open to learning new things and to hearing others opinions and experiences.  Not everything works for everyone, and not everything works for every horse.  But having an arsenal of different things to try is definitely a good thing.  I feel blessed to know a few trainers who are willing to help me when I have questions.  This past weekend, I had the opportunity to go watch and learn from one of them.  Trainer Blair Cecil of Phoenix Farms, my AOT hat goes off to you and your awesomeness!

The lesson?  Bit converters. I confess, I bought a pair of these in August 2017 and I haven’t so much as snapped them to a single thing.  Yes, that’s been 5 months ago. No, I’m not afraid to admit my lack of confidence on things I know nothing about. Hence why I started asking questions, to learn from others!

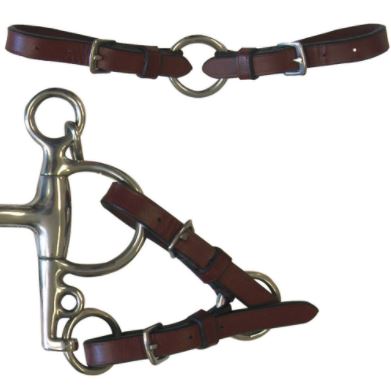
What is a Bit Converter?  A bit converter is, as the name states, a contraption that “converts” two bits into one.  It allows you to line/jog a horse in a full bridle (two bits) using just one set of lines, making 2 bits usable as one.  The photo shows this on a short shank pelham bit, not a 2 bit weymouth style that we normally use in saddleseat, but the same general concept applies.

Bit Converter

Why do this?  My horse, like many others, is SO much happier when only ridden one, maybe two times a week.  He loves to jog, which is terrific for his back end, building muscle, and conditioning.  BUT, when you can only ride a few times a week, it’s difficult to log much time in a full bridle.  Without wearing a full bridle often, it’s difficult to get them completely comfortable wearing it.  As explained to me by Blair, using the converters in a lining/jogging situation is a lot more forgiving than riding.  Here’s why:  When you ride, there’s a lot more going on.  Your seat, how you shift your weight, your leg aids, how good your hands are, how much you’re in or not in their mouth, how you hold two sets of reins, and what kind of pressure you put on each.  Not to mention the stress on their backs from carrying a rider every single day on top of everything going on in their mouth.  All of that is removed when you line/jog using these bit converters.  The horse gets used to wearing the bits without all the stress from every day riding.

Equipment Needed:  Surcingle (with or without crupper), martingale (optional), full bridle (use the bridle/bits your horse is used to wearing), long lines, and 1 set of bit converters.  Oh, and if you use a lunge whip for lining, that too!

How to:  I wish I would have taken pictures.  When I attempt this with Fiz, I’ll definitely update.  Until then, I’ll do the best I can to describe everything.  So here goes. (NOW UPDATED WITH PICS!!! Yayyyyyyy!!!!)

Apply all the equipment as usual.  Tie reins for the bridle in a knot and attach them to the top of the surcingle using string, a double ended snap, whatever you’ve got, so they don’t just flop all around and get tangled in the rest of the equipment.  Or I guess you could remove them if you wanted to, your choice. To attach the bit converters, attach one snap to each bit on both sides of the bridle.  Running your lines:  Here’s where you’ll find there are different configuration options, which I never even thought of before visiting Blair! I promise to update with photos once it’s not so frozen outside and I can start working Fiz again!

  1. Run the lines through the converter ring and to the snaffle. This is where you should start with introducing your horse to the converter and lining in a full bridle.  The curb will be in their mouth, but basically it’s just there, with no pressure on it.IMG_20180121_1352572.  Run the lines through the converter and attach it to the curb. This puts pressure only on the curb bit. This seems better suited for a horse who is BROKE to the curb. IMG_20180121_140318.jpg
  2. Run the lines and attach to the ring on the converter. This puts pressure on both bits.                                                                IMG_20180121_140403
  3. All of the above configurations can be done running the lines through a martingale or not using a martingale. It’s up to your preference and what you and your horse are used to using.
    1. Adjusting the converter: If you have purchased a set of bit converters, they should come with some kind of adjustment holes, so you can adjust how much pressure goes to each bit.  Naturally, if you want even pressure, adjust them to the same length.  If you want more pressure on the snaffle for example, loosen the end going to the curb.  Proper adjustment for the horse you are working is the key to success.

Here’s a video of me lining Fizzy in the first configuration.

Fizzy Long Lining – Full Bridle


Update on Fiz’s training!

Fiz has been at a professional trainer since March 25th. He’s there almost through the end of April. There have been some big changes in his life during this time period. He is used to living in a pasture, and only coming in to work, then going back out. He lives in a stall the majority of the time at the trainers place. He is used to being worked only about 4 days a week. He is getting worked 6 days a week at the trainer. He’s used to amateurs who fly by the seat of their pants and lack professional training knowledge. Now he’s being worked by a professional who has a clearly defined training method and structure.

Today, April 14th, he’s been with the trainer for about 2.5 weeks. I got to ride him for the first time since he has been there. Cindy rode him on Saturday, and had a really great ride. I would like to talk about some of the things I noticed with her ride, and some of the things I learned during mine. I will also talk about some of the training advice we have gotten and how it differs from the ideas we previously had.

First, let me say this. He is much improved in several areas. Below, I’ll take you through the gaits and what advice has been offered for each.

#1, The Walk
Flat, straight, and patient. Make him walk straight up into the corners and make the arena square. Make his shoulders and his hips walk inline with each other, and make sure as you are walking to push him up to the bridle so he has to take ahold of it. Do not pull. Hands steady, and in the same spot. When he takes hold, give. Just a small release of your fingers, but keep pushing with your leg making him walk up to the bit.

#2, The Trot
A country pleasure horse needs 2 trots. The pleasure trot and extended trot. We knew this, but previously Fiz would get mad when he was asked to go faster and he would break into a canter without ever actually going faster. It’s better to have only one speed than have to break, so that’s what we used to do.  A pleasure trot needs to have energy, it needs to cover ground, but it also needs to save room for max trotting speed at the extended trot. Same principles apply as the walk, use a lot of leg, push him to the bridle and make him take hold as he moves forward. Music to my non-equitation body type and mind frame was, let your legs hit him in the sides and even flop around on him some. Apply pressure, keep him moving forward and pushing from the hind end. He is expected to move from the back to the front, pushing off his hind to give his front momentum. Always keep the whip right against his shoulder.

When you ask for the extended trot, cluck, then squeeze (don’t kick) and if he doesn’t move on, give a slight tap with the whip on his shoulder. Not a whack, a TAP. If that doesn’t do it, growl at him and tap again. He has learned that he has to move on and not break into the canter. That doesn’t mean he will never break. If he does, don’t stop! Keep cantering. Teach him that it’s more work to do the wrong thing than the right. Rest assured, he will find his trot after enough of making him go and go, and you will find the sweet spot where you have hit max trotting speed before he has to canter. If you really want to find good separation, work him at a pleasure trot, then extended trot, and bring him back down to a pleasure trot. Even if just for one rail, you try to find that max speed, really ask him to step up, then come back down to the pleasure trot. Keep the energy and the go forward all the time. Do not forget about contact with his mouth (keep this in mind at all gaits) and do not forget that reward of giving when he takes a hold on his bridle and moves on forward. Always give him that reward.

#3, The Canter.
His canter cues are more clearly defined and he is learning the expectation for getting and keeping the correct lead both directions of the ring. Previously, we thought each time he took it wrong, we should stop and ask again until he got it right. This method had taught him if he does it wrong, he gets to quit. The new method is, no matter which way he takes it, do not let him stop. Make him GO. And go, and go some more. Teach him that just because he does something wrong, he does not get to stop and quit. He’s working no matter what he does, and again, it’s going to be harder when he does it wrong.

The canter cue needs to be very clear. A slight turn of the head (bring the rail rein straight back and at the same time give with the inside rein with a release of your fingers), rail leg, and SPEAK the word “Canter” to him. Speak the word EVERY TIME you ask for the canter. Do not be afraid to be vocal. IF he runs sideways when you turn to canter, DO NOT let him canter. This is unacceptable behavior that will be punished by forcing him back to the rail and to walk straight, and patiently, until he is asked again for the canter with the clear signal. This could mean setting him up to canter multiple times, but never allowing him to actually take off. Set up to canter and then go back to straight walking forward on the rail until he doesn’t get all sideways and crooked. Then maybe trot. Do anything else so he loses the train of thought to anticipate cantering.

When cantering, he is capable of cantering SLOW.  Take back on the upward motion, and give on the downward motion.  Give and take, constantly.  And still, SAY the word CANTER, or make a “kiss” sound to him.  Make him canter straight, and do not let him swing his back end to the middle, because this makes it easier for him to swap leads.  If anything, turn his head more toward the middle so it makes it more difficult for him to swap leads or fall out of the canter.  When he does it right, don’t push the issue or make him keep on going. Maybe one or two trips around is good, then quit on a good note.  Remember, make it EASIER to do the RIGHT thing.

12140048_10154166158764444_2067037096436532418_o

Bottom line is, he’s going to make mistakes. The most important thing is to teach him that it’s easier on him to do right than to do wrong. Bad behavior is punished by harder work. Good behavior is rewarded by giving (releasing your fingers) in the bridle and getting to be finished sooner because he did everything you asked and he did it correctly.

Always ask yourself the question: “Am I training or am I un-training?” and if you are not certain, it’s probably the latter. If you can answer that you are training, follow up with “What is this teaching him?” and as long as you are happy with what it is teaching, stick with it. If you’re not, change it up. Think ahead, have a plan, and execute that plan.
Another thing we’ve been taught is that he needs to jog. And jog, and jog, and jog. The more fit he is (which is accomplished by miles and miles in the jog cart) the easier it is going to be for him to do the right things, the easier it will be for him to be able to willingly go forward and move on. We can’t ask him to run a marathon when he’s been working as a sprinter.

Check out this video clip after his first week of training.

A Short Video from Professional Training

Show Season is coming, SOON!!!

So, our first show is less than a month away.  KASPHA May Classic, we will be showing Friday night in the Novice Rider Country Pleasure and the Novice Country Pleasure.  Novice is defined as not winning more than 5 blue ribbons at a rated show, which, neither Cindy, I, nor Fiz have.  Don’t judge us, it’s a very competitive sport!!  Anyway, we have begun serious training to prep for show season, and show shoes will be put on very soon, prior to show numero uno. The winter hair has been shaved off and the shedding blade is being used before and after every workout. We are very excited about show season this year!  In the mean time, enjoy some random videos of Fiz from this winter.  

Science Behind Training Aids?

We have visited training aids and their uses before under here, and have talked about the use of light chains and other devices on horses feet as a method of helping develop a desired gait.  Again I want to state that there has been a lot of controversy over the use of these and some people call it cruel.  I disagree, noting that proper use of devices can be safe, and also beneficial and helpful in training.  I recently read an article on TheHorse.com associating “leg weights” with rehabilitation, physical therapy, and assisting with building muscle.  A study has been conducted proving that the use of such devices indeed do not harm the horse.  I could have told you that, but there’s never really been any documentation to back this up. Now, there is!

Read the article on TheHorse.com and see for yourself!  Leg Weights And Rehabilitation.

That said, I reiterate that you MUST apply the chains/weights correctly or you are going to cause your horse harm.  Do not apply them so tight that they dig into your horses skin, and don’t apply them so loose that they get stuck around your horses hoof/coronary band/heel bulbs.  They should freely move around the top of the coronary band and pastern, but not so much they sink down and get stuck.

See there, us Saddlebred people are not so cruel to our horses after all with our training aids.  Most of us actually pamper our horses and treat them better than we do ourselves.  We live for their well-being and safety.  Just remember that!